Do You Know Anyone Who Finished Renos In 2012?

Yesterday was the day that the Department of Finance released the tentative property tax valuations for the coming year. Our valuation went from $333K to $1.91M. That means our property taxes are going from about $3,500/year to something around $21,000/year! [Why does the City seem to want to punish people for improving their communities? I mean dealing with DOB is a nightmare, and now this…]

The way it’s supposed to work is that the amount of improvements to the property is added to market valuation of the property. Normally DOF is limited in how much they can jump your property taxes, but when you do substantial improvements that is the one time they’re allowed to bump the taxes up substantially – but only by the amount of improvements to the property.

If I understand things correctly they threw out the PW3 Cost Affidavit that we submitted to the Department of Buildings and instead used the number $1.46M which their appraiser appears to pulled out of thin air since it’s nothing close to the actual cost. Mind you, “cost” is one of those things that’s a bit flexible and open to interpretation since what you report to DOB is “hard costs” which don’t include everything you spend money on. But it’s not like we’re arguing over small amounts that might be due to the interpretation of “hard costs”. There is just no reality in which we could have spent $1.46M – we simply didn’t have access to that kind of money.

The reason why I’m asking in the title of this post whether people know of other people who completed their jobs in 2012 (and possibly even late 2011) is because I suspect there’s a problem assessor covering Central Harlem. 104 West 120th had an assessment last year of $262K. Their PW3 cost affidavit was for $315K and the assessor gave them a market valuation of $1.5M – so she’s in the same boat we are – it’s just the change isn’t quite as drastic as ours.

If a bunch of us can all band together and go to DOF together, then I think our individual cases will be strengthened and it will seem like the problem is with the assessor. If you know of anyone who might be in the same situation, please have them contact me – jay@beatingupwind.com. I’ll be happy to look up their particulars if they don’t know how to find them. And if you just know the address for buildings that had completed projects last year, please put them in the comments below and I’ll look them up and contact the owners if appropriate.

Update (Jan 21st):

In researching the situation – looking for other places that completed their work in 2012 – I discovered that it’s also affecting some of the folks who haven’t gotten their jobs signed off yet..

There’s a place on 136 that filed a preliminary cost estimate of $50,000, but they’ve had about $650K added to their market value by DOF before the renovations are actually completed. Their taxes will just about triple because of that – not as bad as our case, but they’re probably going to have more added next year when they complete their renovations.

But that’s nothing compared to what’s happening to 241 Lenox (which has also not completed their renovations yet)… They filed cost estimates totaling about $850K. The assessor has raised the market value on that place by $650K which doesn’t seem like a horrible thing on the face of it, but the problem is the tax class was not changed. So their tax bill is going from about $13K/year to a whopping $56K/year. I think they’re doing 2 family plus commercial. I don’t know if that qualifies for tax class 1. If it does, then keeping them at tax class 2 is just spiteful. It’s adding $40K to the cost of their renovations.

Hot Air Doesn’t Always Rise

When we were designing the house I wanted a recirculating duct from the living room on the parlor floor to the bulkhead 4 flights up. I figured in the winter we could pull the hot air from the top of the stairs down to the parlor, and in the summer we could push cool air up where it was hot.

Problem was, the architect wasn’t too enthusiastic about the idea, and his mechanical engineer told me air in buildings didn’t work that way – that the hot air wouldn’t rise. That contradicted everything I had been taught in grade school. He said hot air only rises when there’s moving air. The air in a well-sealed house with the windows shut doesn’t move.

I didn’t believe him and when we got to the end of the project the recirculating duct was one of a short list of things I felt like I would have done differently if I could do it all over again.

Well, who’d have guessed – but the mechanical engineer was right. It’s winter and the top floor is at least 5 degrees cooler than the lower floors. It’s not because of poor insulation – we’ve got an R62 roof and R22 walls and great windows. At first I thought it might be just be that the room where I was when it struck me had had the door closed. But then I moved into the stairwell and it was the same there.

In the summer the area up in the bulkhead would get incredibly hot, but apparently that was because of solar heat gain from the large bulkhead windows (and glass door). But in the winter there’s less solar heat gain even – though the bulkhead is designed to capture winter light and discourage solar heat gain in the summer.

Now I’m perfectly happy the recirculating duct wasn’t put it. The air is cold up in the bulkhead – there’s no point of pulling cold air down into the living space in the winter. And likewise with the summer – we don’t need the bulkhead air conditioned.

The moral of the story is engineers know what they’re talking about. Who’ve guessed? lol

Modern Efficient Water Heaters Are Fragile

Our hot water went out earlier this week. The cause? The boiler room was dirty. Seriously…

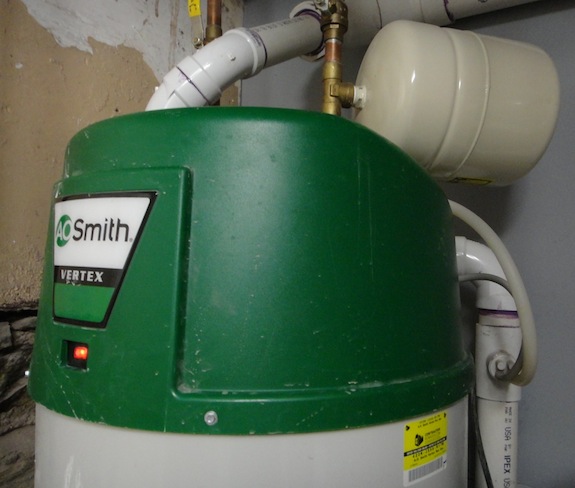
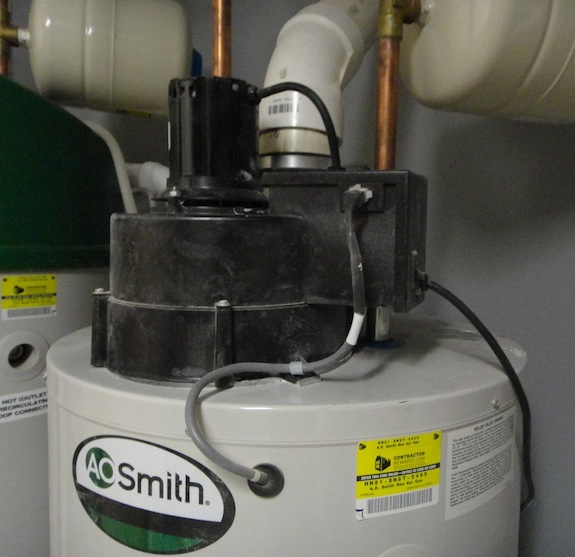
Old style water heaters just sat there. Their exhaust was hot, so it rose up the chimney without any effort. New water heaters aren’t anything like that. Hot air going up the chimney isn’t efficient – the heat should be going into the water, not the atmosphere. So they use fans to push the exhaust up the chimney. If you see fan motor sitting on top of your water heater you have one of the new, more efficient, water heaters…

power vent water heater fan

Sometimes the fan is concealed a bit behind a plastic cover…

power vent water heater cover shield

Because the exhaust gases are more condensed and not as hot, instead of using a tin chimney, you’re supposed to use PVC or CPVC or stainless. In fact you’re not allowed to use tin for the chimney  – I think the gasses can corrode tin.

Anyway, the air the fans push up the chimney has to come from somewhere. There are two types of modern water heaters – Power Vent and Direct Power Vent. The term “Power Vent” means, they have a fan that pushes the exhaust up the chimney. Direct Power Vent means the air intake is piped from outside – air inside the boiler room is not used.

I wanted Direct Power Vent, but we were venting through the roof and the total length of piping for venting was a problem. You have to count the air intake into the total length of ducting allowed. In our case, since we have a 5 story townhouse, the intake pipe would have put us over the allowed ducting or dangerously close to being over.

Because the air on a Direct Vent water heater comes from the boiler room, not outside as the repair guy put it – “you’ve got a big vacuum cleaner” sitting in your boiler room. It sucks in air at the bottom, spirals it around the tank and pushes it out the top. So any loose dirt that’s sitting on your floor will get sucked into the water tank. If it’s not light enough to make it to the top of your chimney it will wind up falling back down into the fan when the fan turns off. Eventually it builds up and clogs the sensors that are there to make sure everything is working properly.

When the repair guy took off the chimney and started the fan a huge cloud of dust and dirt went into the air. Not good – and the cause of our problems. Luckily no parts had gotten fried, so as soon as he had cleaned things up everything was working again.

So in hindsight, if you can, I’d recommend a Direct Power Vent instead of a Power Vent. Your outside air is likely to be cleaner than the air in your boiler room. But whichever you have, be careful about the cleanliness of the air going being sucked in. With a Power Vent keep your boiler room clean. During construction that can be hard – so just turn the water heater off until the boiler room can be clean. Even with a Direct Power Vent you should worry if there’s dust in the air where the air intake is – for example, if they’re doing construction next door, etc.

One other thing the repair guy said was that PVC can be a problem for the vent stacks. Apparently the temperature can get high enough to crack the PVC. CPVC or stainless is better. We’ll keep the water temperature down to try to avoid that problem. If you do put in PVC, keep a close eye on it for problems.

Low Water Pressure => Booster Pump

When we moved in 6 weeks ago we noticed a few things that indicated problems with our water pressure. The flushometer (tankless) toilets didn’t always flush properly and the massage setting on our shower head didn’t really do much in the way of a massage. Then the plumber realized he had installed the wrong size water meter and hadn’t put in an RPZ valve. When he downsized the meter from 1 1/2″ to 1″ and put in a double check valve (similar to an RPZ) we really started having problems – more often than the not the toilets just wouldn’t flush properly.

After yelling at the plumber for weeks we finally got him to come out and diagnose the problem. Here’s what we had for pressures – they’re probably pretty typical for what other Harlem townhouses are seeing…

In the cellar…
We have about 45 psi coming in from the street
On the sprinkler system that drops to about 40 psi after the check valve
On domestic water we drop to about 30 psi after the water meter & double check valve
The 30 psi is maintained to the bottom of the run for the toilets (in the cellar)

At roof level (up about 55 feet)…
The sprinkler system has about 24 psi
The outside hose connector has about 8 psi

What that means on a practical level is that it takes us a full minute to fill a 59 oz (<1/2 gallon) Tropicana bottle in the slop sink on the top floor. That’s BAD. Down in the cellar with 30 psi the same bottle filled in less than 5 seconds (about as quickly as we could get the valve open and then close it again).

That means the sprinkler system lost about 15 psi over about a 55 feet rise while the domestic supply for sinks, etc. lost 22 psi over the same rise – that’s because the sprinkler system uses larger diameter pipes which can preserve pressure more effectively.

The line for the toilets is bigger and separate from the one for the sinks, so pressure in it should be somewhat better (though not as good as the sprinklers). The flushometer valves can operate down to 10 psi, but the toilet bowl requires 25 psi and 18 gpm to flush properly. You can see how we just don’t have enough pressure, and probably not enough flow. We probably have the 25 psi in the rental, but on up in our unit the pressure just isn’t sufficient.

Even when we didn’t have a double check valve and we had a larger diameter water meter the toilets didn’t always flush properly. So the bottom line is if you want flushometer toilets, or you want massage shower heads to work properly in the upper floors of a Harlem townhouse you’re probably going to need a booster pump.

Booster pumps get very expensive if your sprinkler system needs more pressure. Sprinklers have incredible flow and a booster pump that can can keep up with a sprinkler system has to be pretty huge, and huge = expensive (over $12,000 just for the equipment and up to $15,000 with installation). However, boosting just the domestic water supply is far less expensive – about 1/10th the price. In fact it’s important not to over-size the booster pumps since they need a certain flow going into them.

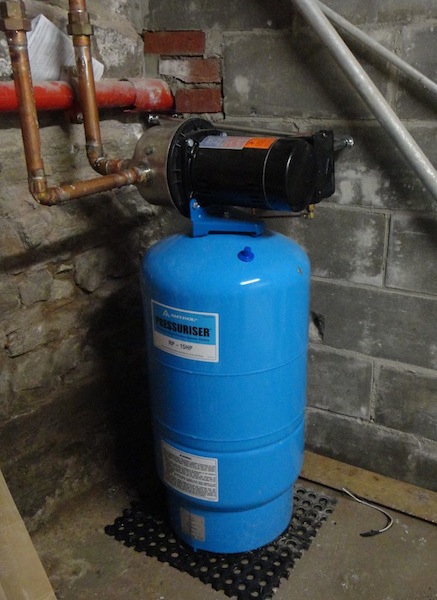
Here’s what our new household booster pump looks like…

Booster pump to boost household water pressure

There’s a pump and a pressure tank. The pressure tank evens out the pressure, so when you flush a toilet and use a bunch of water all at once it can hit a reserve and won’t have to suck everything out of the incoming water supply.

Now that that’s in the toilets flush properly and Dan says the massage setting on the shower actually feels more like a massage…

Incidentally, the pressure in the ground floor rental seems just fine. We’ve put in a rain shower there – so no massage shower issues, and the toilet flushes enthusiastically. So only our unit needed help.

Our Stoop Gets Rebuilt

My apologies for not blogging lately… When we moved in I just sorta crashed, but the workers are still making good progress. They’ve been working on the stoop for what seems like forever…

We were going to have a sub-contractor do the work, but one company wanted to charge $53,000 (just for the stoop), and the other one kept missing and being seriously late for meetings (not a good sign on a critical path task). So our contractor is having his guys do the work.

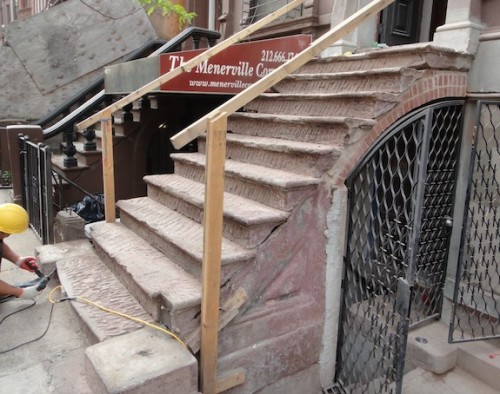
The process starts by taking a jack hammer to the old brownstone, removing any loose stone, and creating a rough surface…

Roughing up the brownstone on a stoop

In some cases that’s quite a bit of stone (see below) – it all depends on how much damage there was over the years…

The next step is to coat everything in a bonding agent so the concrete-based mix they put on will adhere to the brownstone – that’s the while stuff in the picture below…

Remove loose brownstone from stoop

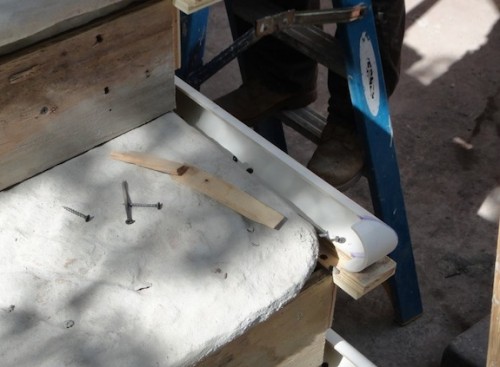
Then everything has to be built back up. For the stair treads they used PVC piping to create round edges…

PVC used for brownstone stair tread form work

That was filled in with concrete to form a new edge. When they did the front they embedded wire in the concrete to reinforce the leading edge of the step.

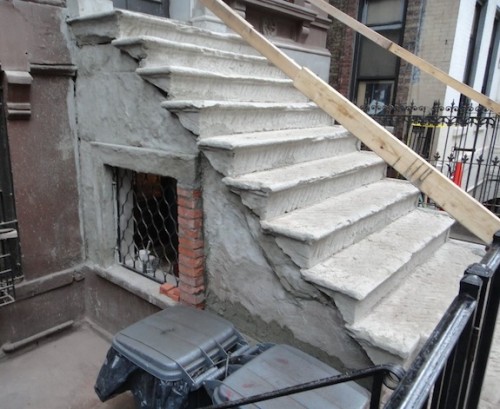
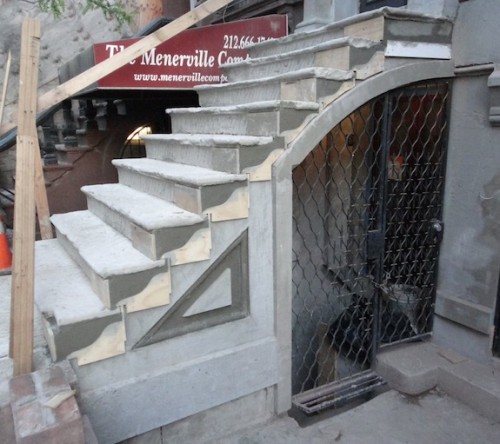
The flourishes under each step also had to be reconstructed…

Brownstone stoop repair

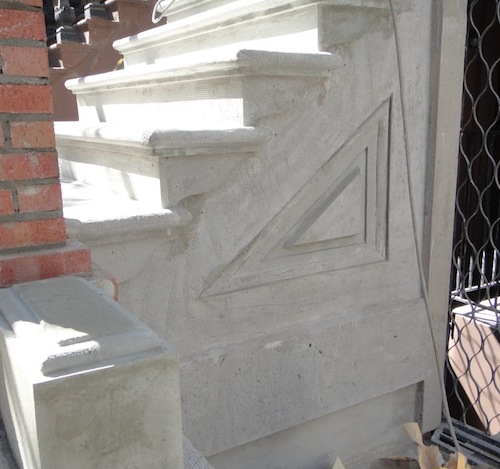
You can also see how they’ve recreated the triangular detail on the side of the stoop. It was a multi-stage process – you can see the picture below has more detail in the design than the one above.

Finished stoop detailing ready for brownstone finish

In the picture above everything is ready for the final “brownstone” finish coat. All the concrete work has a very coarse finish to it that’s not quite visible in the picture.

You can also see that they’ve recreated the low walls that were there originally.

Simultaneously to that another worker has been grinding all the rust off the original ballusters (and the ones we bought at Demolition Depot to fill in what we were missing), but that’s the subject of another blog post.

We had a hard time figuring out what to do with the newel posts. A building on 122 was willing to sell us their newel post and railing, but the price was high, and it didn’t give us everything we needed and it was only one newel post and one section of straight railing (plus a bunch of ballusters we didn’t need). In the end we decided to do masonry newel posts since it was less expensive, quicker, and what the National Park Service has approved (though we made a few changes to the approved design).

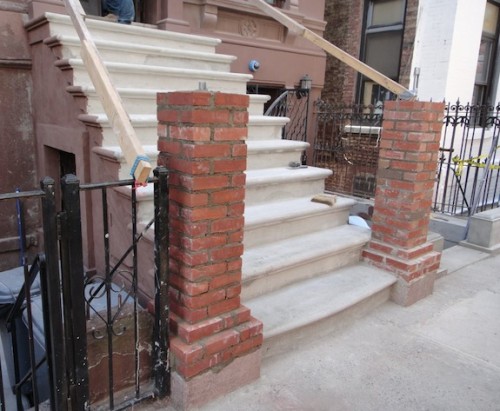
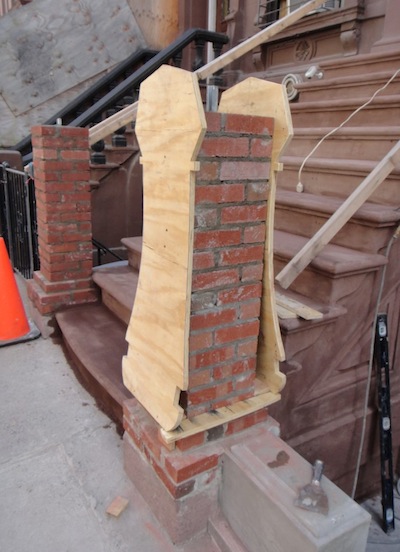
The first step in building up the newel posts is building up a brick core…

Brick core for masonry newel posts on brownstone stoop

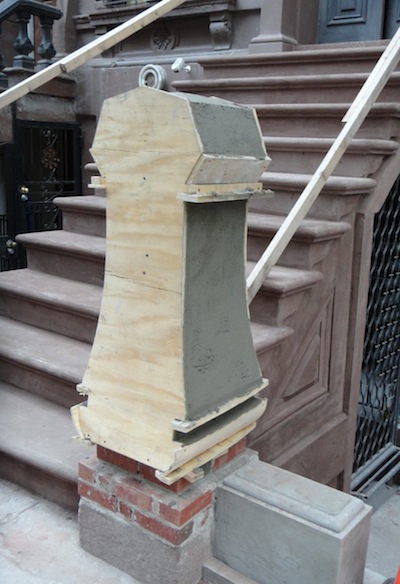
Then forms are built in the shape of the final design, and those are put over the brick cores…

Newel post with template for reconstruction

Then concrete is put on the brick and a straight edge is drawn down guided by the templates to make the concrete into the correct shape…

That’s where we stand as of today. Tomorrow they’ll take off the forms, do the other sides and repeat the process with the other newel post.

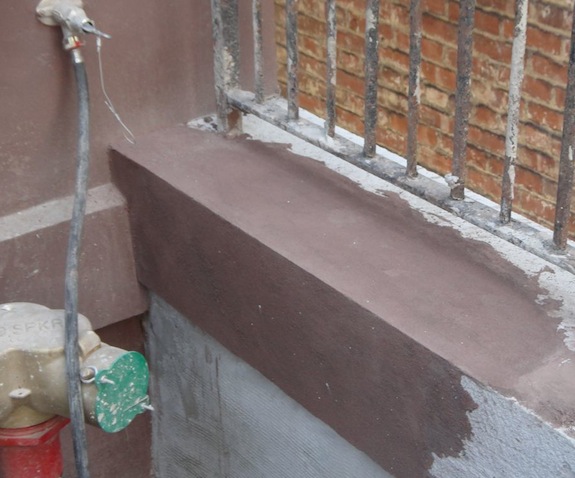
The other thing you can see in the picture above is the brown primer for the final “brownstone” coat. They did a sample area of the finish today…

sample brownstone finish

The house wall is painted, the retaining wall has the “brownstone” finish. It’s not the same quality as the $10M townhouses you see on the Upper West Side, but it’s better and hopefully more durable than a lot of what we see around Harlem. It doesn’t look like brown sandpaper. It looks better than brown stucco, but almost has a paint-like quality to it – though it has more of a texture than paint.

I think the newel posts will be painted (black), and not have a brownstone finish – that should make them look more like the cast iron originals. There are actually brownstones on 119 just east of Lenox that have all concrete railings, ballusters and newel posts. At first glance they pass for original, though when you get close you can see a concrete texture and as they age they get lichen in the crevices…

One thing I should mention is that we’re not refinishing the under side of the stoop because if water gets through the new finish on the top, it needs to be able to go through the stone and get out.

So we’re getting there… I just want them to be done though… But soon enough they will be done.