With Townhouses, Width Means A Lot…

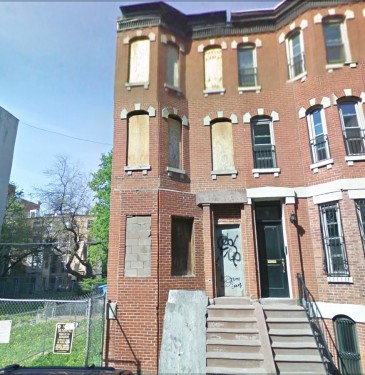
When we bought our place we kept having people tell us “that’s narrow” (it’s 15′ wide – 13 1/2′ inside brick-to-brick). It’s not as narrow as some – we looked at a few that were 12 1/2 footers, but it is narrow. Harlem Bespoke’s post about 148 W 121 reminded me about the importance of width… Consider the following…

168 West 123 (our place) 148 West 121
Dimensions 15′ x 60′ 18′ x 50′
Stories 5 5
Square footage 4,500 4,500
Sale Price $530K $750K
Previous Owner TPE Townhouses Harlem TPE Townhouses Harlem
Sale Date 9/15/09 3/3/10

To me that’s pretty remarkable… Same previous owner, same neighborhood, same square footage, yet they paid 41.5% more for their place than we paid for ours.

But the reason is pretty simple – width… 18 feet is the width when developers start getting interested in a townhouse. Building code requires a 3′ wide staircase and 3′ hallways. You’ll need one public hallway for the staircase and then another inside the apartment. Even if you do exposed brick, you’ll have at least 8″ of wall, so you need 9′ 8″ just for the required parts. In our building that leaves less than 4 feet for a bathroom, which isn’t enough. On a standard 18 footer that has about about 17 feet brick to brick you have over 7 feet of room for the bathroom, closets, etc. – which is plenty…

That means if you’re looking for a bargain on a Harlem townhouse shell and you just want it to be 2 or 3 family, then you should go narrow… You’ll get a better price on a 15 or 16 footer than you will on an 18+ footer, ’cause you won’t be competing with developers.

UPDATE: One thing I forgot to mention is that once a narrow townhouse is renovated it can sell for good money as is evidenced by the recent comp over on 119. So this really does seem to be a supply vs. demand issue. There’s just more demand for wider shells than there is for narrower shells. You pay a premium at 18+ feet because you’re competing with developers.

Choosing & Budgeting Hardwood Floors

A few days ago Dan and I went out to look at plumbing fixtures and hardwood floors just to get an idea of how much we should budget. We randomly stopped at State of The Art Wood Flooring Group over in Murray Hill (it was between the subway and Smolka). The guy at State of the Art was great and patiently answered our questions. Later in the day we did a quick stop at Lumber Liquidators just to get an idea of how cheap wood floors can go.

We want a good wood floor, but aren’t going for anything exotic. Our stair treads will be wood, so we need the same species of wood throughout the house – that would get very expensive if we went with a rare wood. That means we’re going to use oak. It’s a great material, plentiful and well priced.

White Oak vs. Red Oak

There are two primary types of oak – red oak and white oak. Dan’s been wanting white oak since it’s easier to stain any color, however red oak is a little less expensive. I was just researching the difference between the two and came across a forum thread that described how white oak has a closed pore structure and red oak has an open pore structure. That means red oak should not be used in wet conditions. (Which means when we redid our old boat’s mast step using red oak we made a pretty big mistake. The mast step sits in the bilge – so it’s frequently submerged in water. Oh well, apologies to the person who bought the boat from us!) So that makes white oak the better, more versatile choice unless you want the reddish color you get with red oak.

Solid Wood vs. Engineered Wood

One thing we did learn by visiting State of The Art Wood Flooring was that engineered wood floors don’t necessarily look like we thought they looked. Both Dan and I thought engineered floors were always glossy, but that’s not the case at all. They had engineered floors in the showroom that had these really cool finishes on them. They were a matte finish and had a little bit of texture to them. They looked like wood that had just been oiled a bit – quite beautiful actually. The texture they had on them is one that’s impossible to replicate with a solid wood floor unless you’re willing to spend big bucks. So it’s odd that the engineered floor looked more natural than solid wood… Go figure. (Of course there were plenty with a high gloss finish as well.)

Another difference between solid and engineered is that solid wood flooring needs to sit in the building for a couple weeks before installation in order to acclimate. Engineered wood doesn’t expand and contract nearly as much, so it can be put down the same day it gets to the job site.

We already knew the two were installed differently. Once engineered is down you have to be very careful about protecting it since it’s pre-finished. The flooring guy said it should go down at the very end of the project right before you do baseboards. That means the contractor we interviewed who had put it down before he’d fully closed up the walls was making a mistake. By contrast you can put solid wood floors down earlier in the process and while you have to be careful to avoid staining them, dirt won’t hurt them because they’ll be sanded during the finishing process.

For the rental unit where we may want to sand the floors every few years to freshen up the apartment, solid wood floors are best because they can be sanded many more times than an engineered floor. We’ve also decided on solid wood for our own unit because we’re going to need to match the appearance with the stair treads and matching factory finished wood could be impossible.

[By the way – don’t even think about laminate flooring. It’s essentially junky wood (or a plastic) with the equivalent of a wood grain wallpaper applied to it. Rarely ever a good idea…]

Flat Cut vs. Quarter Sawn vs. Rift Sawn

How you cut the boards from the tree makes a difference in the grain you get…
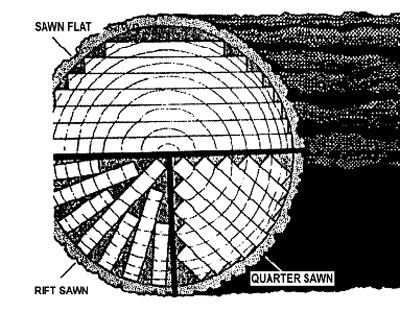
flat quarter rift diagram

Flat sawn is the standard and least expensive way to make wood flooring. When you see oak floors that have a lot of wavy grain in them – they’re flat cut. On the other end of the spectrum is rift sawn flooring. Here the grain is perfectly uniform and all in nice linear lines that run the length of the board. But if you look at the diagram you can see that because it’s a radial cut, there’s a lot of wasted wood. Quarter sawn is a compromise between flat and rift. The grain is much more uniform than with flat cut, but not as perfect looking as rift sawn – you’ll get banded lines across the boards, which can actually be quite pretty. There’s not nearly as much wastage with quarter sawn as there is with rift cuts so quarter sawn is less expensive than rift.

We also learned that there’s a category called “quarter sawn or rift sawn” that’s cheaper than just quarter sawn. If you look at the diagram you’ll see there’s one large rift sawn board in every set of quarter sawn cuts. It takes time to separate that board from the others, so if you’re OK with either then you’ll pay a little less.

Quality

There are different qualities of wood. If you don’t mind knots, then you’ll save money by getting “natural grade”. However, if you want a cleaner look with no knots then you’ll want to get “select grade”.

The Price Points

For starters there’s a range of prices for both engineered and solid wood and those ranges overlap a lot. You have to first find what you like and then look at the price. Don’t go into it thinking you want an engineered floor so you can save money. You may find the solid wood floor you like is less expensive than the engineered floor you like.

With solid vs engineered you also have to factor in the cost of installation which is much lower for engineered floors. As a general rule of thumb a solid floor will cost $4.50 to $5/sq. ft. to install, so you need to add that to the cost when you compare the prices.

Cut rate prices on 3/4″ thick unfinished solid wood flooring (from Lumber Liquidators)…

  • $2.89 – 4″ Red Oak, flat cut, natural grade
  • $2.99 – 4″ Red Oak, flat cut, select grade
  • $3.19 – 4″ White Oak, flat cut, select grade
  • $3.29 – 2 1/4″ Red Oak, quarter sawn, select grade
  • $3.49 – 3 1/4″ Red Oak, quarter sawn, select grade
  • $3.99 – 2 1/4″ White Oak, quarter sawn, select grade

They also said that given the square footage we’re doing we could take about 20 cents off each of those prices.

State of the Art Wood Flooring had a much higher quality selection to choose from, still for a basic wood floor their prices weren’t all that different than Lumber Liquidators…

  • approx $4/sq. ft. for unfinished 4″ white oak
  • approx $15/sq. ft. for unfinished oak precut for a chevron pattern
  • approx $13/sq. ft. for finished, engineered floor
  • approx $19/sq. ft. for finished, engineered cut into a chevron pattern

Add $4.50 to $5 for finishing and you see that unfinished solid wood comes out a bit less expensive than a nice engineered floor. I’m pretty sure those prices were for flat cut, select grade, so you can see Lumber Liquidators saves you approximately 25%. Still, we’re just talking about $1/sq. ft. to go with a full-service, high-quality flooring company. I’m sorta inclined to pay the extra to get the service and quality…

What We’re Budgeting

  • Rental (cellar level) – TBD
  • The rental unit (ground floor) – 3 1/4″ white oak, flat cut, natural grade – $8.50/sq. ft.
  • Parlor floor (areas with chevron pattern) – 2 1/4″ white oak, quarter or rift sawn, select grade – $20/sq. ft.
  • Parlor floor (areas with straight boards) – 3 1/4″ white oak, quarter or rift sawn, select grade – $10.50/sq. ft.
  • 2nd floor (master bedroom, etc.) – 4″ white oak, quarter or rift sawn, select grade – $10.50/sq. ft.
  • 3rd floor (office, guest bedroom) – 3 1/4″ white oak, flat cut, select grade – $9.00/sq. ft.
  • 4th floor (stair hallway) – 3 1/4″ white oak, flat cut, select grade – $9.00/sq. ft.
  • 4th floor (Dan’s art studio) – commercial grade vinyl flooring TBD

So basically $10/sq. ft. or double that where there’s a pattern.

The Kitchen Starts To Take Shape…

Early last week we went to Ikea in Paramus. We were having fantasies that we’d like high end of Ikea well enough to live with it for 5-10 years before we replaced it with what we really wanted – a high-end European modular system. But we didn’t see any Ikea kitchens we’d want to live with (we should have known that would be the case). We did find a great one for the rental unit, but nothing for us. On the way home from there we were driving past Poggenpohl so we stopped in. We know we can’t afford a high end modular Euorpean kitchen, but we wondered if we could afford a basic one. All the stuff we liked at Poggenpohl was at the upper end of their price range and the rest of it didn’t really resonate with us.

On Good Friday we headed over to the A&D building to do two things – 1) try to get inspiration and ideas for what we can and should be doing in terms of finishing details, and 2) to understand the price points. We started at Poliform since our old kitchen had been a Poliform kitchen. The Poliform showroom is now massive – takes up a whole floor – but everything was being ripped out and redone in preparation for a May relaunch of their showroom just before ICFF. Long story short Poliform blew us off and told us a few days later that they weren’t going to bother to do a proposal for us because they expected prices to fluctuate before we would be buying (a completely lame excuse, IMHO).

We stopped at a number of other kitchen places but our favorite was Eggersmann – a German company that’s only just started selling in the US. Their stuff was INCREDIBLE (take a look at their website), and the sales person who was helping us was not only nice and helpful, but she also knew her product backwards and forwards and so she was extremely informative. And kudos to them for being the first ones to get back to us with a proposal. And the proposal wasn’t just a sales sheet – there was a whole 3D mockup… These guys are GOOD!

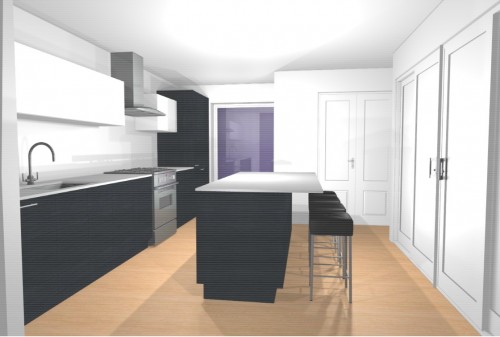
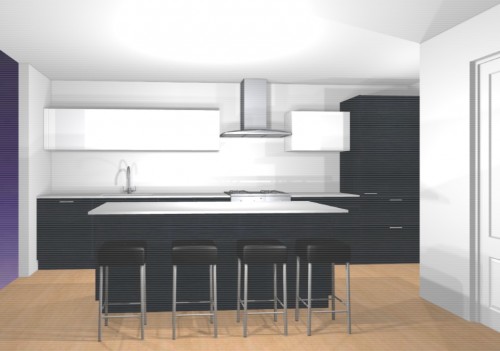
Here’s what they came up with – realize this is just a first draft…

Kitchen design by Eggersmann
Eggersmann's initial plans for our kitchen

The ceiling height is wrong – it’s 10 1/2 feet and they don’t show the stairs and the doors will have glass panels in them, but it’s great first shot…

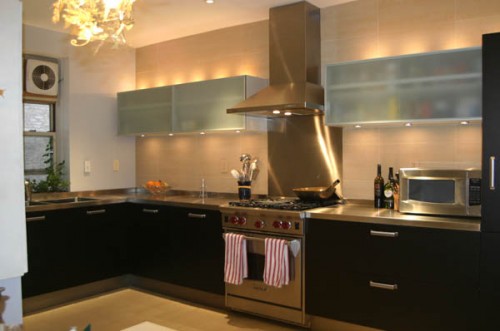
As they should, the renderings got us wondering about the layout of our kitchen. For starters, notice the similarity of the layout with our old kitchen…

Our old Poliform kitchen

Both have a tall vertical (the fridge) to the left, then the range in the center and the sink off to the left. As much as we loved our old kitchen, we want something new… To that end we’re thinking the sink or possibly a cooktop could go in the island to change things up.

The first rendering also made us realize that we don’t really want the closet right inside the front door. It makes the space too narrow. So we’re going to move it down where it’s opposite the stairs and then put a long bench across from the kitchen and narrow the island and remove the stools. That will give a wider walkway with a lot more shoulder room, but we’ll still have a place to sit to put on and take off  our shoes and a place guests can hang out while Dan’s making dinner.

Unfortunately, while we love Eggersmann, we may not be able to afford them. The price they came back with was double what we paid for our Poliform kitchen 5 years ago. Even if we cut back on how much they do (not do the entry closet, etc.) their price may still not fit into our budget – we’ll see… But if you’re doing a renovation and like a modernist aesthetic, we highly recommend them – their stuff is possibly the best we’ve seen.

We’re also having Siematic spec a “lower end” kitchen (by their standards). If that doesn’t come in at a price we can afford and we can’t afford Eggermann then we’ll probably give up doing a European modular system and go with a “custom kitchen”. The problem is local craftsman don’t have the same abilities as the European factories. That means we have to be careful to design the kitchen in a way they can execute properly. That’s a lot more work for us, but it is what it is…

Surprisingly High Comp For A Harlem Townhouse Shell

11 West 119th Street, Harlem townhouse shellHarlem Bespoke just pointed out that 11 West 119th Street sold recently – for $400,000! That might seem like a low price, but actually it’s a surprisingly high price. The building is 14′ x 38′ on a shallow 65′ lot. 14′ x 38′ x 4 stories = approx. 2,128 sq. ft. So the cost per square foot was $188/sq. ft. By contrast we bought ours a few blocks away for $118/sq. ft. If 11 West 119th had sold for our price per square foot the price would have been $250,000. The final asking price was $450K. I’m not sure why the buyer only got $50K off final asking when most people buying similar properties tend to get $150-200K off asking. (For example, we got $265K off what they were asking when we started bidding).

During our search we went through the one 2 doors down – 7 West 119th Street. It was fully renovated with some high end finishes (Sub Zero fridge, but just “better than rental” cabinetry). It wound up selling for $1.0983M. It’s hard to figure out the square footage of #7. Officially it’s 2,794 sq. ft. so it officially sold for $393/sq. ft. However, the City has it’s length at 47′ when all it’s sibling neighbors are officially 38′. I don’t remember it being pushed out in the back and the permit they pulled said no enlargement was proposed. It’s on a lot with a diagonal back line – one side it’s 54′ deep, the other it’s 58′ deep. I remember the back yard basically being a small deck, but it the short side was definitely more than 7′ feet long. So I really think the square footage of #7 is smaller and more inline with it’s neighbors. On top of everything else they did a double height living room so it was probably under 2,000 of real square feet. If it were 2,000 sq. ft. then the price per square foot would have been $549/sq. ft. which is way over what the other comps support. By comparison the incredible one on Strivers’ Row went for $505/sq. ft.

11 West 119th is a SMALL townhouse that shouldn’t be made into more than a single family home (#7 was made into a 2 family with a tiny studio apartment and I think it was a mistake). It’s not not in a historic district (though it is literally adjacent to a one). It’s steps from East Harlem where values are somewhat lower. It’s across the street from (relatively nice) public housing. So I’m not seeing how the property commanded $188/sq. ft. But with both #7 and #11 selling way over what the comps support — apparently they’re smoking really good over at that end of West 119th Street!  😉

No matter – this is a great comp for those of us who own townhouses. Be happy! And for the new owners of #7 and #11 West 119th Street – the values will go up in the coming years and they’ll still make money when they sell.

But honestly – if you’re looking to buy a Harlem townhouse shell – get a damn good real estate broker and a subscription to Property Shark that includes comps and really get to know what things are actually selling for (as opposed to what they’re listed for). A Property Shark membership is WAY cheaper than overpaying for real estate.

Budgeting Tile – Cost Per Square Foot

I’m going to start doing quick blog posts on different things that need to be budgeted for construction/renovation. First up is tile. We went into a few tile stores to figure out price points we should be using for budgeting. Some were completely unhelpful when they heard we were just budgeting and not ready to buy, but others were great and told us what we should be thinking in terms of cost per square foot.

Studium in the A& D Building, and Kaleidoscope Tile in Chelsea were both extremely helpful and I’d recommend visiting both. Studium is pretty high end but has some surprising bargains. When we told the sales person we were on a budget his face dropped, there was an awkward pause for about 2 seconds, and then he picked right back up enthusiastically and showed us options that were perfect for people on a budget. Kaleidoscope Tile feels lower end, has good prices, and has some tiles that can deliver a very elegant look.

  • Low-end “builder’s grade” – about $4/sq. ft.
    • e.g. 4″ x 4″ glazed tiles (the ones you see in bathrooms from the ’50s and ’60s)
  • Nice, inexpensive tile – about $7-8/sq. ft.
    • Great for walls, may or may not be not be suitable for floors
    • e.g. large format porcelain tiles (12″ x 24″)
    • e.g. 12″ x 12″ stone tiles (common stone, nothing exotic)
    • e.g. 1″ x 3″ carrera marble (if you can find someone who handles them in high volume)
  • Better quality tile for floors, etc. – $15-20/sq. ft.
    • e.g. better stone in simple patterns
  • High quality for accents, trim, etc. – $30-35/sq. ft.
    • e.g. sheets of staggered thin strips of carrera marble
    • 1″ x 1″ ceramic tiles for floors
  • Crazy expensive stuff if you have way too much money – $80-100/sq. ft.
    • e.g. architectural glass

(Prices do not include tax, etc.)

Here are some of the price points we’re using:

Rental unit bathroom

  • Wall tile – $7/sq. ft.
  • Floor tile – $13/sq. ft.

Rental unit kitchen

  • Floor tile – $15/sq. ft.
  • Backsplash – $15/sq. ft.

Our kitchen

  • Backsplash – $33/sq. ft.

Parlor floor half bath

  • Wall tile – $15/sq. ft.
  • Floor tile – $35/sq. ft.

Master bath

  • Accent wall – $35/sq. ft.
  • Other wall tile – $13/sq. ft.
  • Floor tile – $35/sq. ft.

2nd full bathroom

  • Small accent area – $35/sq. ft.
  • Other wall tile – $9/sq. ft.
  • Floor tile – $33/sq. ft.

Of course, we’ll go under on some and over on others, but those prices should give us a realistic amount of money to work with. Of course it helps that our bathrooms will be relatively small – so less tile will be required, keeping costs down and letting us spend more per square foot.