Low Water Pressure => Booster Pump

When we moved in 6 weeks ago we noticed a few things that indicated problems with our water pressure. The flushometer (tankless) toilets didn’t always flush properly and the massage setting on our shower head didn’t really do much in the way of a massage. Then the plumber realized he had installed the wrong size water meter and hadn’t put in an RPZ valve. When he downsized the meter from 1 1/2″ to 1″ and put in a double check valve (similar to an RPZ) we really started having problems – more often than the not the toilets just wouldn’t flush properly.

After yelling at the plumber for weeks we finally got him to come out and diagnose the problem. Here’s what we had for pressures – they’re probably pretty typical for what other Harlem townhouses are seeing…

In the cellar…
We have about 45 psi coming in from the street
On the sprinkler system that drops to about 40 psi after the check valve
On domestic water we drop to about 30 psi after the water meter & double check valve
The 30 psi is maintained to the bottom of the run for the toilets (in the cellar)

At roof level (up about 55 feet)…
The sprinkler system has about 24 psi
The outside hose connector has about 8 psi

What that means on a practical level is that it takes us a full minute to fill a 59 oz (<1/2 gallon) Tropicana bottle in the slop sink on the top floor. That’s BAD. Down in the cellar with 30 psi the same bottle filled in less than 5 seconds (about as quickly as we could get the valve open and then close it again).

That means the sprinkler system lost about 15 psi over about a 55 feet rise while the domestic supply for sinks, etc. lost 22 psi over the same rise – that’s because the sprinkler system uses larger diameter pipes which can preserve pressure more effectively.

The line for the toilets is bigger and separate from the one for the sinks, so pressure in it should be somewhat better (though not as good as the sprinklers). The flushometer valves can operate down to 10 psi, but the toilet bowl requires 25 psi and 18 gpm to flush properly. You can see how we just don’t have enough pressure, and probably not enough flow. We probably have the 25 psi in the rental, but on up in our unit the pressure just isn’t sufficient.

Even when we didn’t have a double check valve and we had a larger diameter water meter the toilets didn’t always flush properly. So the bottom line is if you want flushometer toilets, or you want massage shower heads to work properly in the upper floors of a Harlem townhouse you’re probably going to need a booster pump.

Booster pumps get very expensive if your sprinkler system needs more pressure. Sprinklers have incredible flow and a booster pump that can can keep up with a sprinkler system has to be pretty huge, and huge = expensive (over $12,000 just for the equipment and up to $15,000 with installation). However, boosting just the domestic water supply is far less expensive – about 1/10th the price. In fact it’s important not to over-size the booster pumps since they need a certain flow going into them.

Here’s what our new household booster pump looks like…
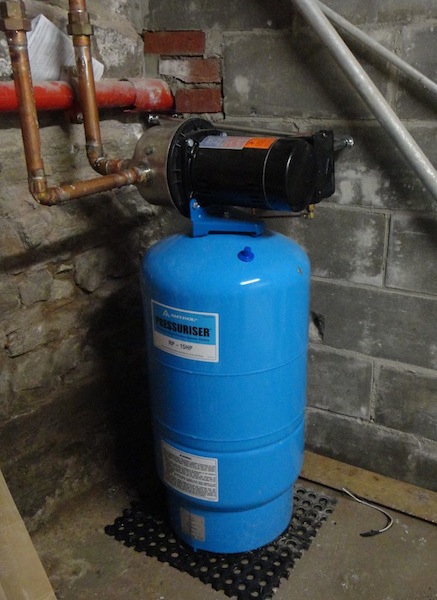
Booster pump to boost household water pressure

There’s a pump and a pressure tank. The pressure tank evens out the pressure, so when you flush a toilet and use a bunch of water all at once it can hit a reserve and won’t have to suck everything out of the incoming water supply.

Now that that’s in the toilets flush properly and Dan says the massage setting on the shower actually feels more like a massage…

Incidentally, the pressure in the ground floor rental seems just fine. We’ve put in a rain shower there – so no massage shower issues, and the toilet flushes enthusiastically. So only our unit needed help.

Our Stoop Gets Rebuilt

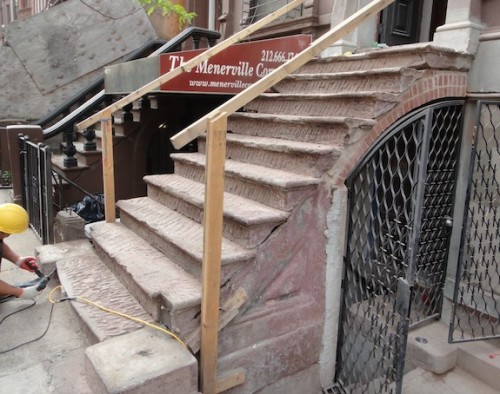
My apologies for not blogging lately… When we moved in I just sorta crashed, but the workers are still making good progress. They’ve been working on the stoop for what seems like forever…

We were going to have a sub-contractor do the work, but one company wanted to charge $53,000 (just for the stoop), and the other one kept missing and being seriously late for meetings (not a good sign on a critical path task). So our contractor is having his guys do the work.

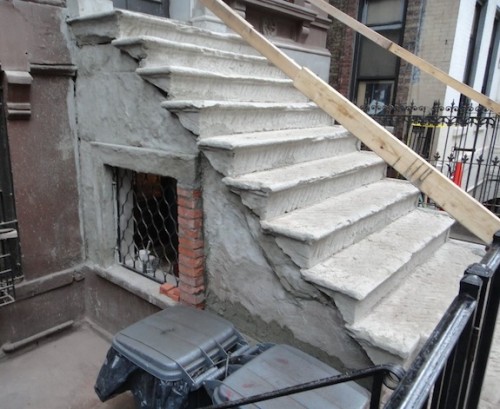
The process starts by taking a jack hammer to the old brownstone, removing any loose stone, and creating a rough surface…

Roughing up the brownstone on a stoop

In some cases that’s quite a bit of stone (see below) – it all depends on how much damage there was over the years…

The next step is to coat everything in a bonding agent so the concrete-based mix they put on will adhere to the brownstone – that’s the while stuff in the picture below…

Remove loose brownstone from stoop

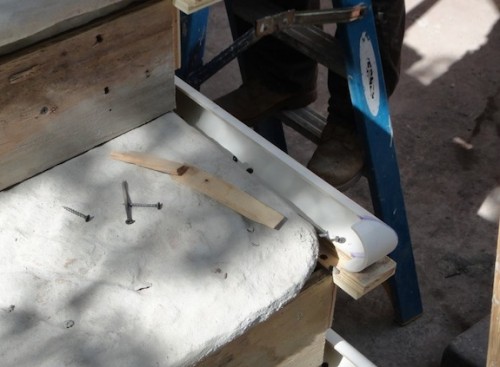
Then everything has to be built back up. For the stair treads they used PVC piping to create round edges…

PVC used for brownstone stair tread form work

That was filled in with concrete to form a new edge. When they did the front they embedded wire in the concrete to reinforce the leading edge of the step.

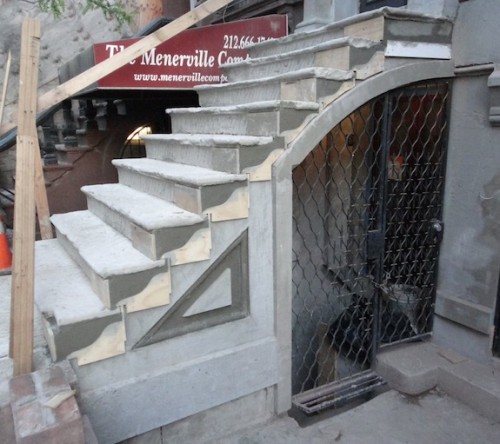
The flourishes under each step also had to be reconstructed…

Brownstone stoop repair

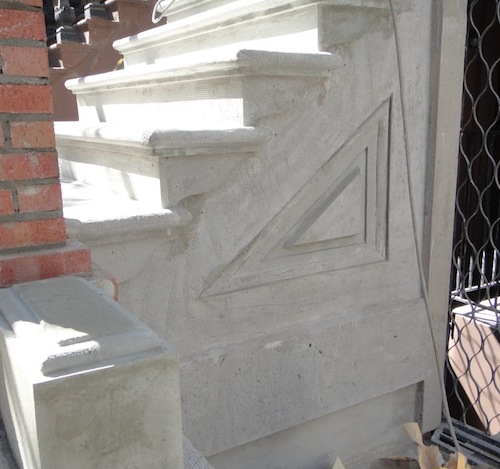
You can also see how they’ve recreated the triangular detail on the side of the stoop. It was a multi-stage process – you can see the picture below has more detail in the design than the one above.

Finished stoop detailing ready for brownstone finish

In the picture above everything is ready for the final “brownstone” finish coat. All the concrete work has a very coarse finish to it that’s not quite visible in the picture.

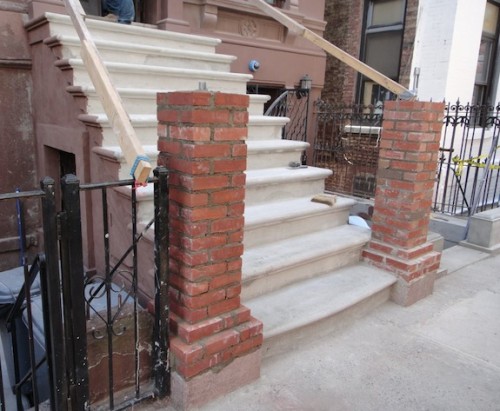
You can also see that they’ve recreated the low walls that were there originally.

Simultaneously to that another worker has been grinding all the rust off the original ballusters (and the ones we bought at Demolition Depot to fill in what we were missing), but that’s the subject of another blog post.

We had a hard time figuring out what to do with the newel posts. A building on 122 was willing to sell us their newel post and railing, but the price was high, and it didn’t give us everything we needed and it was only one newel post and one section of straight railing (plus a bunch of ballusters we didn’t need). In the end we decided to do masonry newel posts since it was less expensive, quicker, and what the National Park Service has approved (though we made a few changes to the approved design).

The first step in building up the newel posts is building up a brick core…

Brick core for masonry newel posts on brownstone stoop

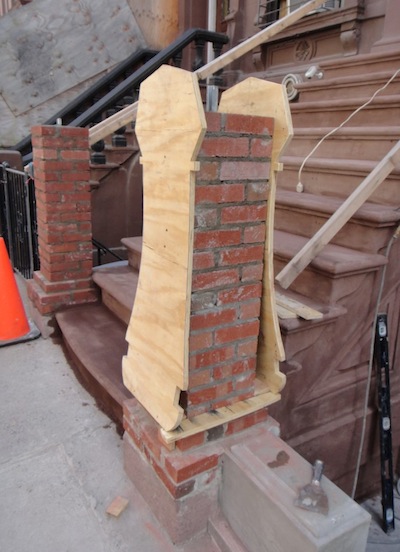
Then forms are built in the shape of the final design, and those are put over the brick cores…

Newel post with template for reconstruction

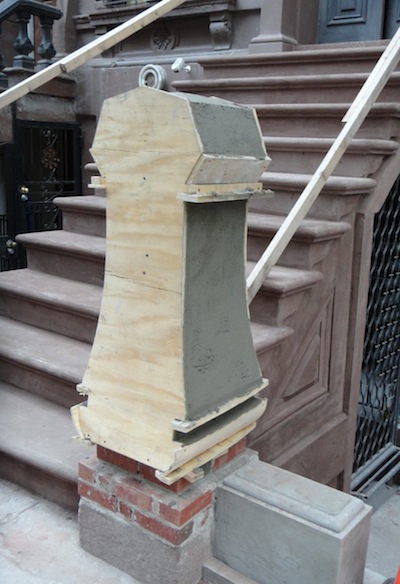
Then concrete is put on the brick and a straight edge is drawn down guided by the templates to make the concrete into the correct shape…

That’s where we stand as of today. Tomorrow they’ll take off the forms, do the other sides and repeat the process with the other newel post.

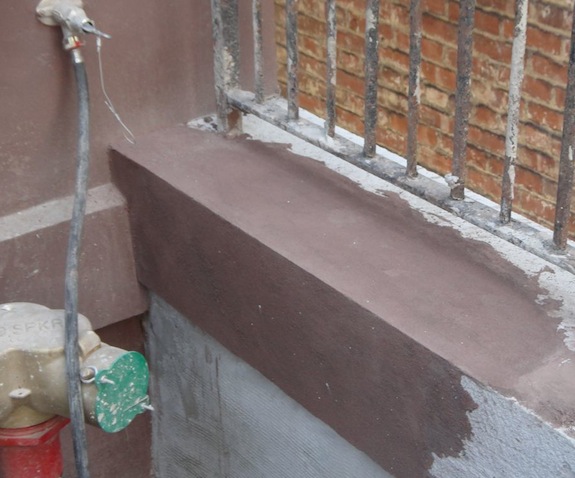
The other thing you can see in the picture above is the brown primer for the final “brownstone” coat. They did a sample area of the finish today…

sample brownstone finish

The house wall is painted, the retaining wall has the “brownstone” finish. It’s not the same quality as the $10M townhouses you see on the Upper West Side, but it’s better and hopefully more durable than a lot of what we see around Harlem. It doesn’t look like brown sandpaper. It looks better than brown stucco, but almost has a paint-like quality to it – though it has more of a texture than paint.

I think the newel posts will be painted (black), and not have a brownstone finish – that should make them look more like the cast iron originals. There are actually brownstones on 119 just east of Lenox that have all concrete railings, ballusters and newel posts. At first glance they pass for original, though when you get close you can see a concrete texture and as they age they get lichen in the crevices…

One thing I should mention is that we’re not refinishing the under side of the stoop because if water gets through the new finish on the top, it needs to be able to go through the stone and get out.

So we’re getting there… I just want them to be done though… But soon enough they will be done.

Wood Stairwell Screen Is Going In

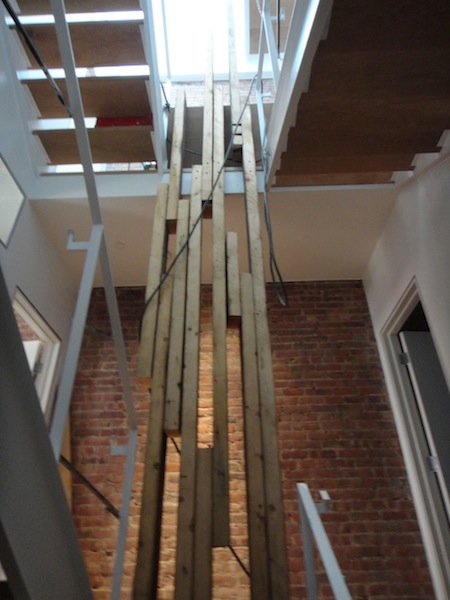
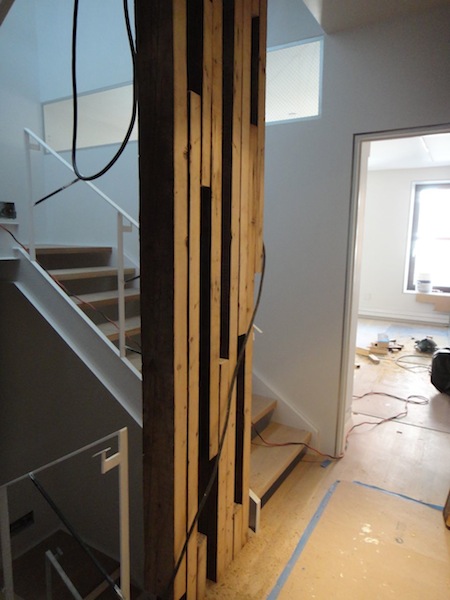
Probably the biggest architectural design statement in our house is our staircase. A big part of that is a wooden “screen” that extends over 30 feet creating a bit of a wall in the stair hallways as you go up. It’s made out of the old floor joists from the building, so it’s our stab at “original details”, since we had none to start with inside the house.

stairwell screen out of reclaimed lumber

Clearly it’s the rustic element in the stairwell. Here’s another shot looking from the other side…

wood stairwell screen

(The electrical cord wrapping around it is temporary.)

There are still curvy/organic frosted plexiglass panels that have to be installed. The architect went over proper installation with the contractor today – so they’ll be in soon.

Master Bathroom Is Pretty Much Done…

We’re at a stage where rooms are starting to be complete, but they don’t look complete ’cause they’re dirty, so today I cleaned all the windows and cleaned up the master bathroom while Dan spent time vacuuming… We’re getting there…

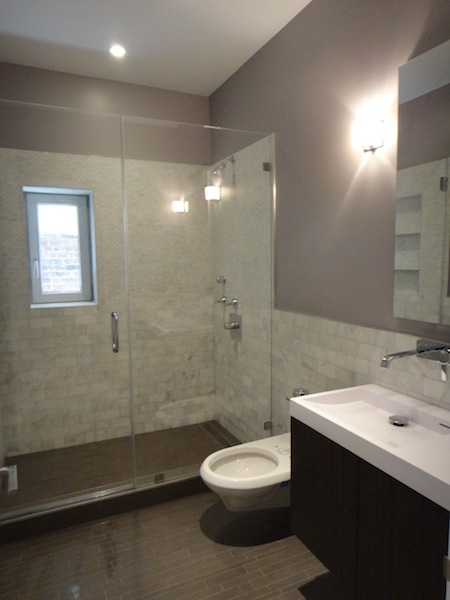
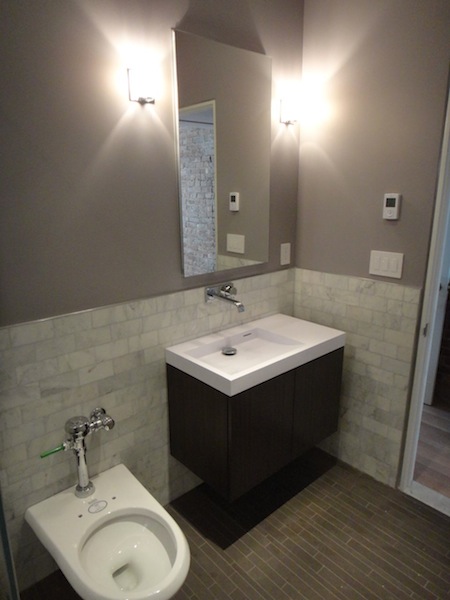
The master bathroom is pretty much done – here’s what it looks like…

Master bathroom

We’re not 100% convinced we picked the right color for the wall – it’s a bit purple, which wasn’t our objective. And clearly, we still need a toilet seat on the toilet.

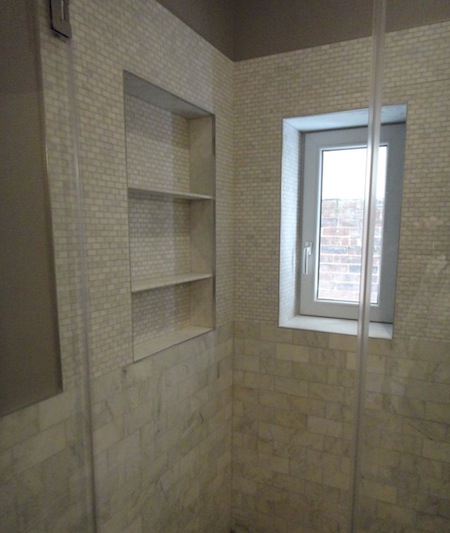
While some people do elaborate “spa” bathrooms, our bathroom is pretty basic and functional. There are a few little things we added… There’s a handheld shower nozzle that still has to be mounted on the wall, but that’s minor. And you can just see the linear shower drain in the shower. In the shower there’s a little inset with shelves where we can put soap & shampoo…

shower shelves

The glass in the window is wire glass, but the window is plastic (since it’s in a shower). I’m hoping we don’t have a problem on inspection with not having a sprinkler head in front of the window (since it’s on a lot line). Our architects researched it pretty well and we were told either wire glass or a sprinkler head was what was needed, but friend just had DOB tell them they needed both. Fingers crossed on that one!

We don’t need any frosting on the window since there’s no one who can see in – just a brick wall a few feet away. But as you can see in the picture there’s still a fair amount of light that gets in despite the window being in a narrow alleyway.

Looking at the bathroom from another perspective (from inside the shower), you see this…

Sink & Toilet in master bathroom

There’s a few things to notice. First is the green handle on the flushometer… It’s a dual-flush flushometer. If you pull up it puts out less water than if you push down. But we had to find a wall-hung toilet that could be flushed with 0.9 gal of water – that wasn’t easy.

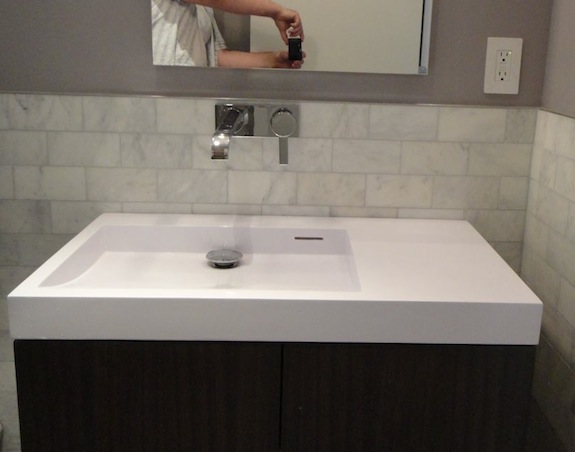
Next is the positioning of the faucet… The sink is off-center of the cabinet, so we were a bit worried how that would look, but I think it looks OK…

Off-center faucet

Another thing to notice is the overflow on the sink… NYC requires that or else you can’t have a stopper on the drain.

So at some point we’ll change the color of the wall, but that will be after we move in. Otherwise, it’s pretty much done as soon as we get a toilet seat and the handheld shower head and some towel bars get installed.

Drama With The Floors Delays Our Move In

A week and a half ago our contractor pointed out that some of the varnish that was put on the floors (Bona Traffic HD) was peeling up. The parts that I saw initially were around the edges and I thought it was just because tape had been put on the floors before everything had cured, but it turns out it was a far bigger problem than that…

When we were in the design phase we looked at a lot of pictures of white oak floors. What we both agreed looked best (to us) were whitish floors. Not too white, but just a bit more white than a natural finish. Dan did a some research and found that Rubio Monocoat had a 5% option that should do the trick.

So we started with that and then the question was what varnish should we use. Monocoat, as the name implies, is a one step floor finish, but we were concerned that wouldn’t be enough. We wanted an oil-based varnish put on top, but the contractor and his floor guy talked us into a water-based varnish.

Dan did some more research and found that Bona had a really good reputation. We figured their two part, high traffic version (Bona Traffic HD) would be a good choice and would wear the best. The floor guy liked Bona, so that’s what we went with.

Dan also called and checked and Bona said there would be no problem putting it over Monocoat, but as it turned out – that was just wrong. What we’ve found is the two products are completely incompatible. Once we started looking more closely the Bona was already coming up in a variety of places and just a light abrasion would make it come up just about anywhere.

Unfortunately, by the time we figured it out there were already two coats of Bona on all the floors and nearly all the stairs. So we had about 4,000 sq. ft. of floors that had to be fixed. The floor guy suggested sanding everything down and starting over, but we asked the contractor to test by “screening” the floors (basically a light abrasion pad on a buffing machine). Remarkably that took up about 95% of the Bona – so that’s how we proceeded.

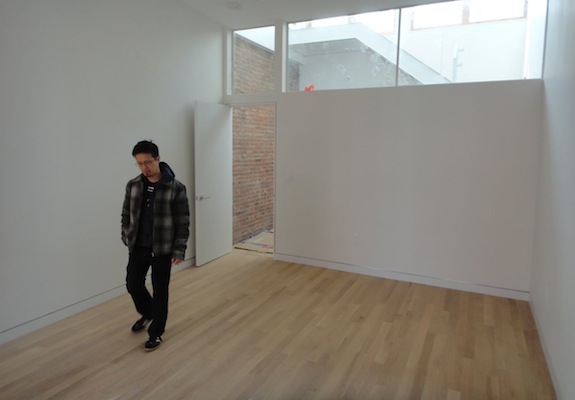
When all the Bona is off, the floors are beautiful – they’re exactly what we were hoping for – a strong hint of white… The photos don’t quite do it justice, but I think you get at least a hint of what it’s like…

white oak floor in gallery

What’s really cool is that Monocoat leaves the floors looking unfinished when they’re actually quite well sealed. Some people on forums say the floors look “hungry”, but as we saw with the Bona – things don’t stick to it.

The other thing that’s cool about Monocoat is that it can be spot fixed. If there’s a problem you just give the area a light sanding and then put some more Monocoat in that area. You can’t over stain a floor with Monocoat because Monocoat won’t stick to itself.

So unfortunately, we had the floors just how we needed them when we put Monocoat on, and then we managed to mess them up with Bona. Taking all the Bona off is taking time. We were supposed to move in today, but this has delayed that. After 6 days trying to fix the problem they’ve gotten the stairs all fixed and 3 of the 4 floors in our unit. Fixing the floor in the rental will happen after we move in.

Dan starts spring break at the end of the week. We’re hoping we can sorta move in middle of next week, with a proper move-all-our-stuff around the middle of the month. Fingers crossed nothing else comes up as a major issue…

Blog posts will be a little sparse until we’re ready to move in. I’m starting to see why all the make over shows have a bit of a blackout right before it’s all done – there are certain things that just don’t show well in pictures at the end because they’re covered with paper, or dusty. As soon as things are uncovered and cleaned up I’ll take pictures do more posts…