Low Water Pressure => Booster Pump

When we moved in 6 weeks ago we noticed a few things that indicated problems with our water pressure. The flushometer (tankless) toilets didn’t always flush properly and the massage setting on our shower head didn’t really do much in the way of a massage. Then the plumber realized he had installed the wrong size water meter and hadn’t put in an RPZ valve. When he downsized the meter from 1 1/2″ to 1″ and put in a double check valve (similar to an RPZ) we really started having problems – more often than the not the toilets just wouldn’t flush properly.

After yelling at the plumber for weeks we finally got him to come out and diagnose the problem. Here’s what we had for pressures – they’re probably pretty typical for what other Harlem townhouses are seeing…

In the cellar…
We have about 45 psi coming in from the street
On the sprinkler system that drops to about 40 psi after the check valve
On domestic water we drop to about 30 psi after the water meter & double check valve
The 30 psi is maintained to the bottom of the run for the toilets (in the cellar)

At roof level (up about 55 feet)…
The sprinkler system has about 24 psi
The outside hose connector has about 8 psi

What that means on a practical level is that it takes us a full minute to fill a 59 oz (<1/2 gallon) Tropicana bottle in the slop sink on the top floor. That’s BAD. Down in the cellar with 30 psi the same bottle filled in less than 5 seconds (about as quickly as we could get the valve open and then close it again).

That means the sprinkler system lost about 15 psi over about a 55 feet rise while the domestic supply for sinks, etc. lost 22 psi over the same rise – that’s because the sprinkler system uses larger diameter pipes which can preserve pressure more effectively.

The line for the toilets is bigger and separate from the one for the sinks, so pressure in it should be somewhat better (though not as good as the sprinklers). The flushometer valves can operate down to 10 psi, but the toilet bowl requires 25 psi and 18 gpm to flush properly. You can see how we just don’t have enough pressure, and probably not enough flow. We probably have the 25 psi in the rental, but on up in our unit the pressure just isn’t sufficient.

Even when we didn’t have a double check valve and we had a larger diameter water meter the toilets didn’t always flush properly. So the bottom line is if you want flushometer toilets, or you want massage shower heads to work properly in the upper floors of a Harlem townhouse you’re probably going to need a booster pump.

Booster pumps get very expensive if your sprinkler system needs more pressure. Sprinklers have incredible flow and a booster pump that can can keep up with a sprinkler system has to be pretty huge, and huge = expensive (over $12,000 just for the equipment and up to $15,000 with installation). However, boosting just the domestic water supply is far less expensive – about 1/10th the price. In fact it’s important not to over-size the booster pumps since they need a certain flow going into them.

Here’s what our new household booster pump looks like…
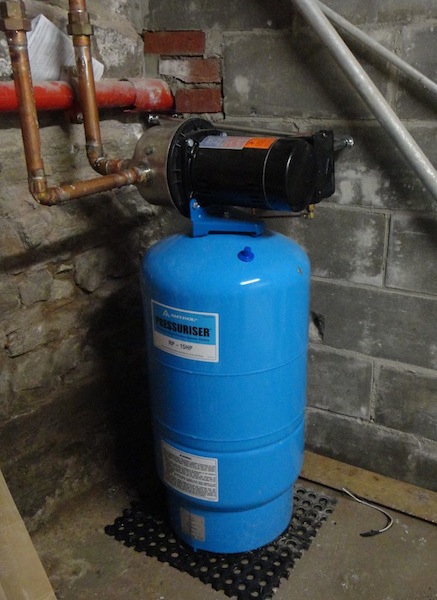
Booster pump to boost household water pressure

There’s a pump and a pressure tank. The pressure tank evens out the pressure, so when you flush a toilet and use a bunch of water all at once it can hit a reserve and won’t have to suck everything out of the incoming water supply.

Now that that’s in the toilets flush properly and Dan says the massage setting on the shower actually feels more like a massage…

Incidentally, the pressure in the ground floor rental seems just fine. We’ve put in a rain shower there – so no massage shower issues, and the toilet flushes enthusiastically. So only our unit needed help.

Our Stoop Gets Rebuilt

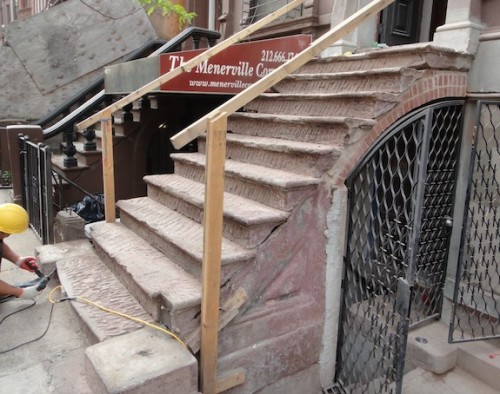
My apologies for not blogging lately… When we moved in I just sorta crashed, but the workers are still making good progress. They’ve been working on the stoop for what seems like forever…

We were going to have a sub-contractor do the work, but one company wanted to charge $53,000 (just for the stoop), and the other one kept missing and being seriously late for meetings (not a good sign on a critical path task). So our contractor is having his guys do the work.

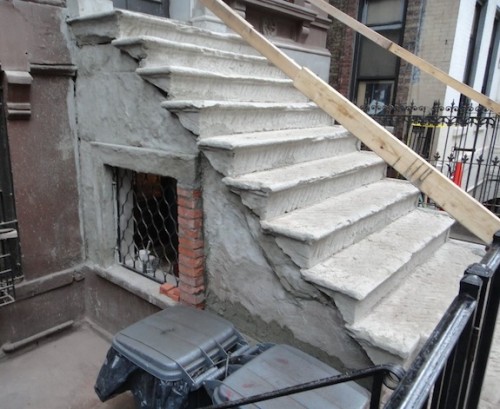
The process starts by taking a jack hammer to the old brownstone, removing any loose stone, and creating a rough surface…

Roughing up the brownstone on a stoop

In some cases that’s quite a bit of stone (see below) – it all depends on how much damage there was over the years…

The next step is to coat everything in a bonding agent so the concrete-based mix they put on will adhere to the brownstone – that’s the while stuff in the picture below…

Remove loose brownstone from stoop

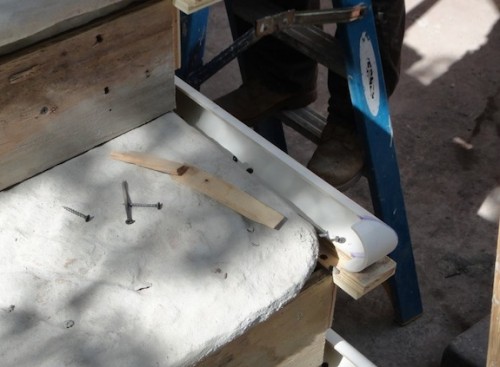
Then everything has to be built back up. For the stair treads they used PVC piping to create round edges…

PVC used for brownstone stair tread form work

That was filled in with concrete to form a new edge. When they did the front they embedded wire in the concrete to reinforce the leading edge of the step.

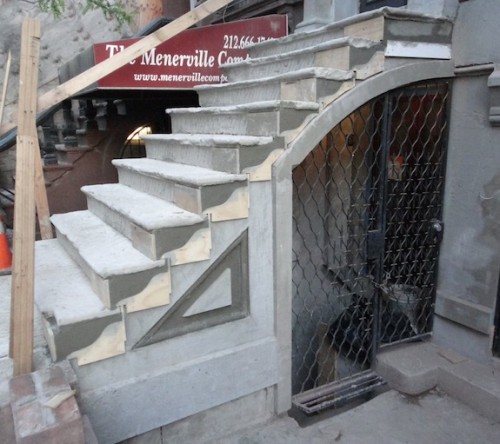
The flourishes under each step also had to be reconstructed…

Brownstone stoop repair

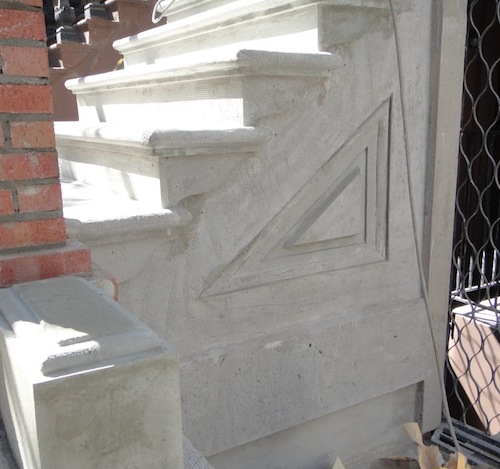
You can also see how they’ve recreated the triangular detail on the side of the stoop. It was a multi-stage process – you can see the picture below has more detail in the design than the one above.

Finished stoop detailing ready for brownstone finish

In the picture above everything is ready for the final “brownstone” finish coat. All the concrete work has a very coarse finish to it that’s not quite visible in the picture.

You can also see that they’ve recreated the low walls that were there originally.

Simultaneously to that another worker has been grinding all the rust off the original ballusters (and the ones we bought at Demolition Depot to fill in what we were missing), but that’s the subject of another blog post.

We had a hard time figuring out what to do with the newel posts. A building on 122 was willing to sell us their newel post and railing, but the price was high, and it didn’t give us everything we needed and it was only one newel post and one section of straight railing (plus a bunch of ballusters we didn’t need). In the end we decided to do masonry newel posts since it was less expensive, quicker, and what the National Park Service has approved (though we made a few changes to the approved design).

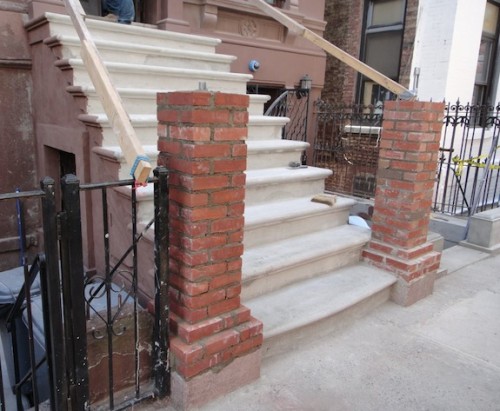
The first step in building up the newel posts is building up a brick core…

Brick core for masonry newel posts on brownstone stoop

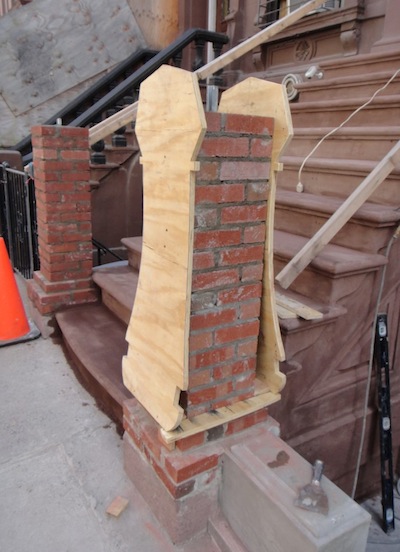
Then forms are built in the shape of the final design, and those are put over the brick cores…

Newel post with template for reconstruction

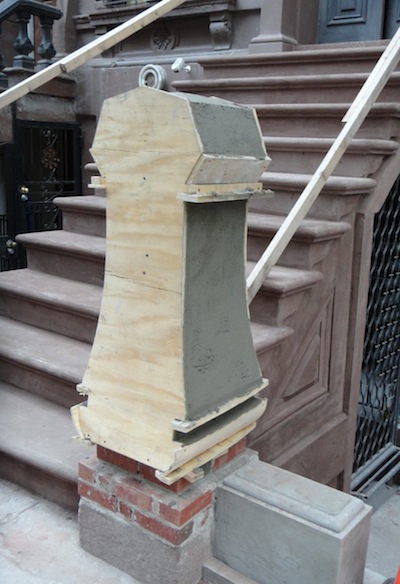
Then concrete is put on the brick and a straight edge is drawn down guided by the templates to make the concrete into the correct shape…

That’s where we stand as of today. Tomorrow they’ll take off the forms, do the other sides and repeat the process with the other newel post.

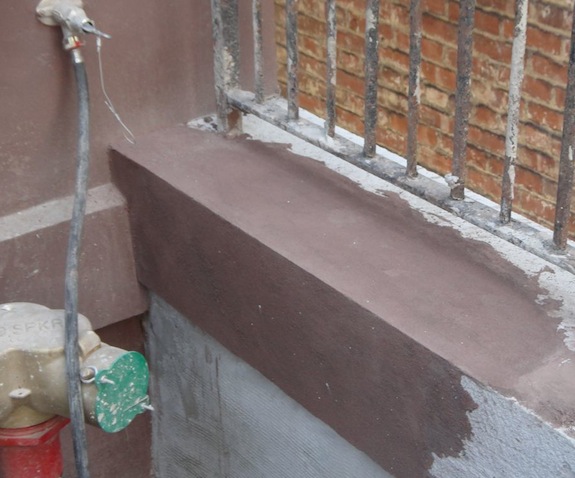
The other thing you can see in the picture above is the brown primer for the final “brownstone” coat. They did a sample area of the finish today…

sample brownstone finish

The house wall is painted, the retaining wall has the “brownstone” finish. It’s not the same quality as the $10M townhouses you see on the Upper West Side, but it’s better and hopefully more durable than a lot of what we see around Harlem. It doesn’t look like brown sandpaper. It looks better than brown stucco, but almost has a paint-like quality to it – though it has more of a texture than paint.

I think the newel posts will be painted (black), and not have a brownstone finish – that should make them look more like the cast iron originals. There are actually brownstones on 119 just east of Lenox that have all concrete railings, ballusters and newel posts. At first glance they pass for original, though when you get close you can see a concrete texture and as they age they get lichen in the crevices…

One thing I should mention is that we’re not refinishing the under side of the stoop because if water gets through the new finish on the top, it needs to be able to go through the stone and get out.

So we’re getting there… I just want them to be done though… But soon enough they will be done.

I’m A Geek – My New Rack Enclosure

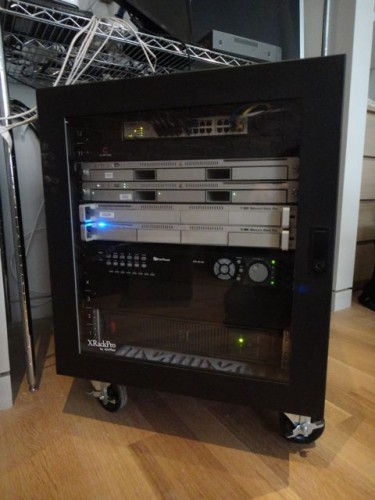
I need to start doing posts on how the renos turned out. But things are a mess in most rooms since we’re still unpacking. But here’s one bit of the reno that’s presentable that shows that I’m a bit of a geek at heart… A 12U XRack Pro, sound insulated, rack mountable server enclosure…

rack enclosure

Real estate is just one of the things I do. I’ve been self-employed doing web stuff for 11 years now. I have some servers left over from when I used to have “colo” servers (now my servers are managed and owned by the hosting company). I’m repurposing those severs and the two rack mountable RAIDs I had for home use (the silver colored stuff). Then there’s the UPS (Uninterruptible Power Supply) that I bought a few years back that’s rack mountable (on the bottom). And new for the house is the DVR for the CCTV security system (with the round dials), and the switch for all the ethernet outlets in the house (at the very top). Since the enclosure can be locked, it means if thieves break in it’ll be harder for them to walk away with the DVR.

All in all I managed to use 9 of the 12U. The rack enclosure tucks into the closet and I’ve designed the closet with a fan at the bottom that pushes in fresh air and a vent at the top of the closet to let out hot air (conveniently next to the A/C). There’s also a metal wire shelf on top that holds all the little stuff that’s not rack mountable. So I essentially have a miniaturized network/server room.

It does create some heat and even though it’s sound insulated it creates a little background noise, but not much considering how loud the server is inside it.

110 West 123 Collapses To The Ground

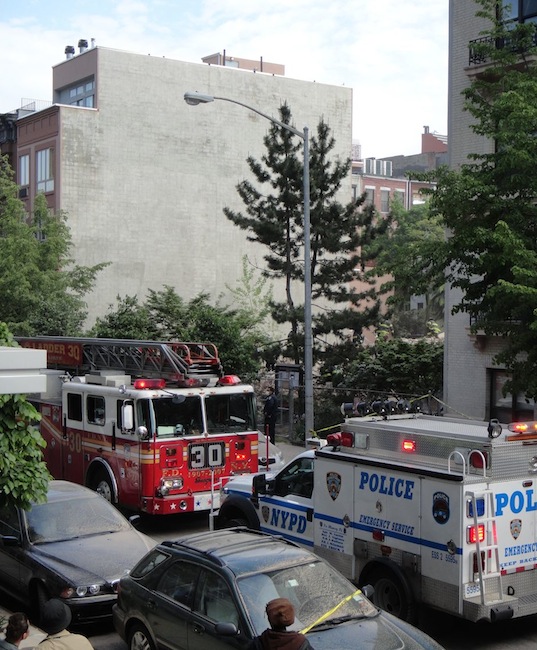
A little after 4pm today Dan and I felt what I thought was an earthquake. Our whole building did a quick, but major shake. It wasn’t an earthquake – a building down the street form ours (110 West 123rd Street) collapsed to the ground – only about 15 minutes after Dan walked past the building…

building collapse

A permit to do structural work had been pulled a few weeks ago, and they had started work earlier this week. First a construction fence, and then I saw the ground floor was pretty much gutted. Given what I had seen I thought for a moment about calling 311 and asking that a structural inspector check out the job to make sure everything is safe. But I didn’t call. Lesson learned on that one. Guess there are times when being a meddlesome neighbor is a good thing.

There was an empty lot to the left (east) and the block association’s community garden to the right (west). The building was sold late last September for $600,000. The last two SRO tenants had stopped living there around November, and the new owner put it on the market for $1.1M in December.

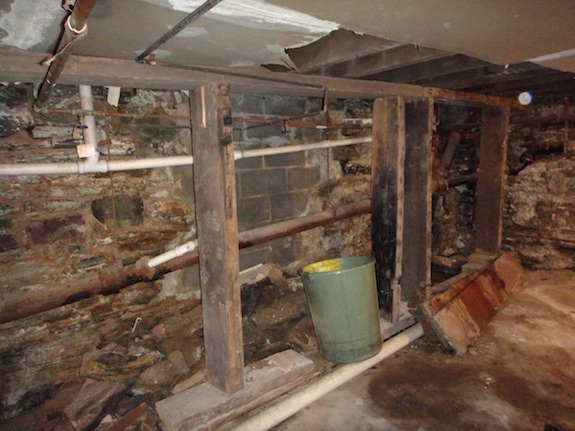
I had taken a couple clients through the house back in December/January. There were serious structural problems evident in the cellar. Here are some pictures of what the foundation looked like…

bracing to support failing structure

In the picture above you can see that they had put bracing in to support the structure that was failing. You can also see that a portion of the foundation had failed and was patched with cinder blocks.

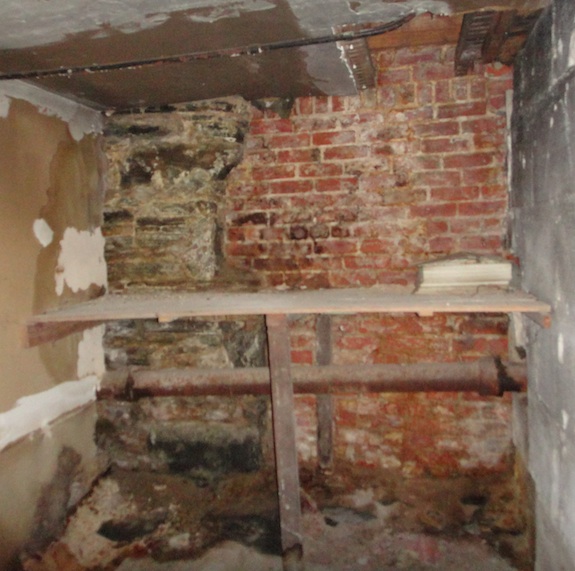
In the picture below you can see another part of the foundation that failed was patched with brick…

brick patch of foundation

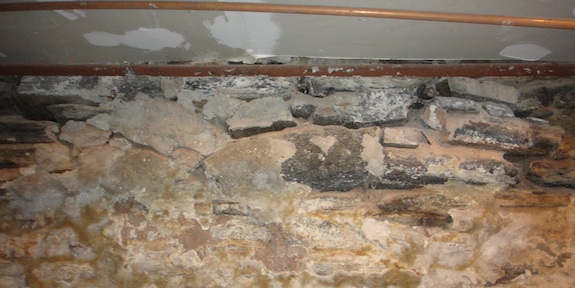
One of the times I went through it our contractor joined us. He told us he was “scared of the building”. That it was the type of building that could collapse without warning if you messed with it. He wasn’t worried so much about the patches as he was about parts of the foundation where the mortar was missing…

missing mortar in foundation

All in all it was VERY spooky to be in that cellar. You could just feel trouble. It wasn’t just that it was dark and dank – I go through a lot of places like that. It was all the bracing and patching.

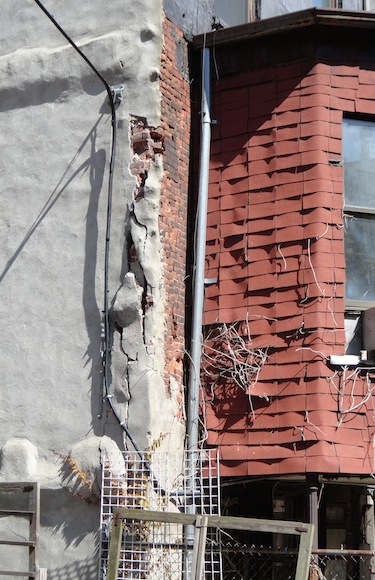
The problems with the building were evident even outside the building. We were in the community garden next door a few weeks ago and I snapped this photo of the corner of the building…

problems at corner

Stuff like that just isn’t good – especially when combined with a wonky foundation.

The extension you see in the picture above is actually interesting. It hadn’t settled, but the rest of the building had. So at one point the floor sloped rather dramatically – probably went up 9 inches over as many feet.

The origin of the problems is that the townhouse used to be part of a row of townhouses, but over time all but this one were torn down. It was never designed to be a freestanding house. To be a freestanding house it needed a lot of reinforcement.

Our contractor said it would be best to tear the place down and start over. If it had to be salvaged you’d have to cocoon it and put walls all around it. Problem is, the garden folks didn’t want to give up land, and the party wall on the other side was already 6″ over the property line. I’m not sure there was really a way to save this building. At most, the façade could have been braced and the rest of the building demolished.

I will say it’s unusually lucky that the workers had left the site when the collapse happened and the community garden was closed and locked. Apparently no one was even walking past. While demolition was most likely what was needed – there are cheaper ways to demolish a building. The City is going to want to get paid all the overtime for their workers. NYPD, FDNY, Parks Department, etc. Apparently right now they’re taking every piece of the building out, spreading it on the street to look for body parts and anything else that can help them in their investigation – how much is that going to cost?

Inside it was a grand townhouse – 20 foot wide. There were some incredible fireplaces…

great old fireplace

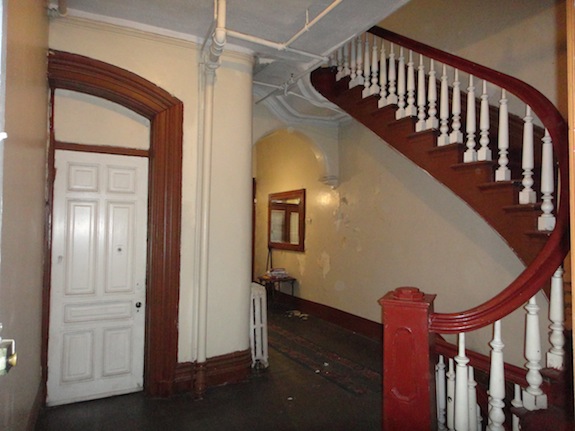
And a grand staircase…

The ceilings were really high, and on parlor there were some that had great plaster work…

In fact the ceilings were so high that the 5th floor could see over it’s neighbors to the south – all the way to midtown.

It’s sad to see buildings like this die, but alas, it happens…

Shell Coming On The Market South of 125

I know some of you who read the blog are looking to do a project similar to what Dan and I have done. The problem is finding shells south of 125 that aren’t ridden with problems (legal, structural, etc) is easier said than done.

Just today I found out about a place in the Mount Morris Park historic district that’s about to go on the market. It will need a total gut renovation – so it’s a similar sized project to ours. It’s a good sized place (I estimate it to be over 4,000 sq. ft.) so the asking price is a bit higher than some other shells, but it’s got the square footage to justify the price.

There is a Certificate of No Harassment in place, so financing is an option, but even so you’re looking at a total investment (purchase + renovations) of around $2M for moderately high-end finishes. While you could do the project for less, that level of finish will result in the place being worth a bit under $3M when you’re done (assuming the market doesn’t drop) – so the project should be profitable.

If you’re interested and want to know more, send me an e-mail – jay@beatingupwind.com