Sprinklers Approved! (FINALLY)

The big item holding everything up lately has been approval for our sprinklers. The plans were submitted June 28th and the DOB was supposed to get them reviewed within 2 weeks. SEVEN weeks later they were approved. Just to put things in perspective – 5 weeks of mortgage payments is about $7,500. So a dud of a plan examiner just cost us $7,500. (Thank you DOB).

In the end there was nothing of any real substance wrong with the plans we submitted back on July 28. The plan examiner was just incompetent (IMHO – $7,500 later I feel I’ve paid enough to put it that bluntly). He didn’t seem to have the faintest idea of what he was actually looking at and he couldn’t even count – he insisted we had 68 heads when we had 38 heads and then gave us an objection for having too many heads on a 3″ water main connection when our sprinkler calculations are based on pressure – the number of heads and the size of the connection are irrelevant if the pressure is sufficient to support the load.

The ONLY thing that changed between the original filing and what was approved was the sprinkler schedule. Here’s what what originally submitted…

Sprinkler schedule submitted to DOB

And here is what what was approved…

Approved sprinkler schedule

Yes, there’s a bit more detail on the approved plans but the original one had the MEA number which is the unique identifier for the sprinkler head. That’s all that’s really important since the specs are based on the particular sprinkler head. If you have the unique identifier for the head there’s no real question about the specs. But I didn’t get the sense that the plan examiner understood the concept of a “unique identifier”. He was saying the inspectors in the field wanted to see things like flow rates. I can’t imagine that’s true – they’d just want to match the part number up to what was spec’d. It’s not like an inspector is going to sit there and do flow rate calculations in the field.

This is the problem with the DOB… Plan examiners need to specialize. Plan examiners for sprinkler systems should have degrees in mechanical or civil engineering. It does no one any good to have a plan examiner review something they don’t understand. If I didn’t trust our mechanical engineer I’d be wondering whether our sprinkler system will work properly when there’s a fire – it’s not like the plan examiner checked the substance of the plans and verified that it will work.

Oh, and on top of everything the plan examiner pads his time sheet. We had 20 minute appointments both times and at the end of everything he was there entering 1 hour into his time sheet. This time he didn’t even bother to discuss anything with Dan and our expediter. He just glanced at the formatting of the sprinkler schedule and then handed our expediter his stamp. Then he signed the sheets once they were stamped. For that he said he worked an hour. “Working” like that, he can get an 8 hour day done before lunchtime.

Now that the sprinklers are approved we can move ahead. The first thing that will get done is a new water main connection (we’ll be digging up the street). At that point we’ll have water, which will be a huge help. Once that’s done ConEd will put in gas and electric. The lack of electricity has been a big problem for our contractor – he’s been doing everything with generators – which gets expensive. Then there will be plumbing inspections and once those are done we can put in insulation. Once the windows are here (in 4-6 weeks) we can start on sheetrocking.

How To Evaluate A Contractor

Dan and I spent a few hours yesterday with a couple who are in contract on a place near us and about to embark on a similar renovation. They’ve asked that I write a post on how to properly evaluate a contractors. So here it goes…

There’s a lot that goes into making one contractor better than another and the first thing I’d say is don’t shoot for perfection. If you’ve got a $10M townhouse on the Upper East Side or in Greenwich Village you can ask for perfection. But people with $10M townhouses have bigger budgets and they pay a high price for perfection – and even then they might not get it. The rest of us have to shoot for less than perfect contractors.

First – Beware of slick sales people. Personality is important – you want someone you get along well with, but we had a contractor a few years back for our apartment remodel who had a great presentation but then was Casper The Ghost when the project was underway. That project wound up in a lawsuit.

Instead, go for contractors who seem like genuinely good guys. Contractors who are a bit too honest and reveal details hurt their image are actually the ones you want to go with. At the price range Harlem townhouse owners are at, the contractor who seems perfect is hiding something – and that will inevitably turn into problems down the road.

Second – See the contractors work – as much of it as possible. And take someone else along with you when you go see things – they’ll spot stuff you missed. Or one person will be engaged in a chat getting info that way, while the other is taking a close look at the workmanship. Along the same line – take lots of photos ’cause you can spot things you missed by looking at the photos.

Look at the quality of the workmanship, but not necessarily the quality of the finished materials since they may have been picked by someone else. Are the floors solid feeling? Do doors close properly? Has the finish stood the test of time (to the extent the contractor is responsible for the finish)? Are walls flat and defect-free? Is woodwork properly mitered at corners? Are there any unsightly gaps in things? etc.

So for example – one contractor we interviewed showed us a Section 8 apartment building he renovated. All the materials were very low end – that wasn’t a problem because low end materials were appropriate for a Section 8 building. The problem was the moldy wall we came across in one of the units – that means he didn’t waterproof properly – that was a problem with workmanship, not a problem with materials.

Another contractor proudly showed us a project he completed a few years ago. He said he built the cabinet doors, but they looked awful – the finish was wearing off them – the just weren’t wearing well. He then showed us another project where he had done structural work and a new roof. There was just plywood subflooring down but the problem was that the floor wasn’t level. When we went up to the roof it was literally flat – it didn’t slope at all and there were puddles of water on the roof. At one point he was our #1 choice – he had glowing recommendations from clients, but the quality of his work just wasn’t there.

When you look at the work they’ve done it’s OK to see projects that are different than yours, but you should see at least one that’s at least roughly like your project. Your project shouldn’t be the the nicest (or worst) project in their portfolio. You should see aspects of your project in their projects. The contractor we settled on showed us everything from rental grade townhouses to free standing homes in Brooklyn to apartment remodels in nice buildings. Nothing was exactly what we wanted, but there were aspects of what we were looking for.

Third – Evaluate the contractor’s work load. Simply put – how important will your project be to the contractor?

One contractor we interviewed (the Section 8 example above) was used to doing much larger buildings. He was upfront and said our project was “extremely important to him”. We got the sense that he had been hit hard by the bad economy and was about to go out of business. That could be a problem if his debts catch up to him and he goes out of business in the middle of your project.

Another contractor showed us a place he was working on that was INCREDIBLE. When he was done all the original detail would look like the day the house was built – only there would be tons of modern amenities as well. He was more than capable of doing a wonderful job, but we got the sense that our project wouldn’t be a high priority for him.

We went with the contractor who said “your project will transform my business”. He had a solid business, he had done aspects of everything he’d need to do on our project but he wanted to get into the townhouse market – working for owners, not developers. Our project is his most important project. When he gets done with the project we know he’s going to want to show it to other prospective clients…

Related to how important the project is to the contractor is how quickly they’ll get it done. A contractor who has a heavy workload can promise you the moon – but do they really have the resources to get things done quickly if they’re distracted by other projects?

Fourth – References are only so important. Go ahead and talk to the references the contractor gives you, but they shouldn’t be the most important factor in your decision. The most important references are the ones where you see the work and get to meet the owner in person.

When you talk to them don’t just go on whether they say good things or bad things, but get into the details of their projects – was their project like yours? The contractor we used years ago that later wound up in a lawsuit – in hindsight one of the warning signs was that his references were people who were flipping apartments. Owners and flippers think very differently. The flipper just wants it to look good until it sells. The Owner cares about whether it will stay looking good and whether there will be leaks, etc. in 5 or 10 years. This time around there was a contractor who one reference said could practically walk on water – she said he had rescued her from disaster. But he was the one with the awful doors, uneven floors and literally flat roof. In the end the reference didn’t know what she was talking about.

Fifth – Make sure the contractor can do all the aspects of your project well. Some contractors are great at finishing work. Others are great at structural. Some have never installed a heating system. Townhouse renovation has a lot of components – make sure your contractor is comfortable doing all of them (or has good relationships with sub-contractors who can take care of them).

For example we interviewed the contractor we wished we had used for our apartment remodel. When he saw our townhouse his comment was “tell me when the structural work is done and I’ll be happy to give you a proposal for finishing things off”. Luckily he was upfront about what he could do. If you get a smooth talking contractor who’s a “fake it until you make it” sorta guy it can be a real problem when they hit something that’s beyond their level of competence.

Sixth – There shouldn’t be too close of a relationship between the contractor and your architect. I’ve touched on this with another blog post, but it’s  problem when your contractor and architect are too close. When the architect and contractor are close (e.g. design/build firms – but not just design/build firms) the architect will sign off on bad work because the relationship with the contractor is more important to them than the relationship with you. It’s fine if they’ve worked together before, but if your architect doesn’t have anything negative to say about the contractor – that’s a problem. You want the architect to be your advocate and have your best interests in mind.

Seventh – Make sure your contractor has a senior “money guy” on his team that will watch the budget and cash flow. It’s rare for someone who’s good at construction to also be good with accounting – be skeptical if the contractor says he’s handling both jobs himself.

Eight – Understand your contractor’s financial position. Where is he getting the money he’ll need to handle cash flow issues? Does he have a large amount of cash in the bank? Does he have good credit and access to lines of credit at reasonable interest rates?

Ninth – Consider asking him to bond the job to ensure that all sub-contractors get paid and none of them put liens on your house.

More Progress With Stairs

The contractor took a 2 week break which is why I haven’t been posting much about things getting done at our place. The delay is because the plan examiner we have at DOB reviewing our sprinkler plans is pretty awful at his job. He gave us an objection for having 68 heads on a 3″ water main connection when there aren’t 68 heads – there are 38. Even if we did have 68 heads the size of the water main connection is irrelevant if the calculations are based on pressure and flow (which ours were). He’s also more concerned about formatting than substance. We had a 2 week delay because he didn’t like the formatting for the sprinkler head schedule. Initially he said we didn’t have a schedule at all – when we did. Then he said the schedule our mechanical engineer came up with wasn’t formatted properly when our mechanical engineer does sprinkler plans (that get approved) all the time. He also basically refused to tell us whether we had all the paperwork in that we need to have in. Monday morning we have yet another meeting to try to get him to approve the plans. Hopefully he won’t come up with some new objection or piece of paperwork that delays us another two weeks. The problem is that by looking at the form of things rather than the substance, plan examiners like him can miss important items. They don’t do anyone any good.

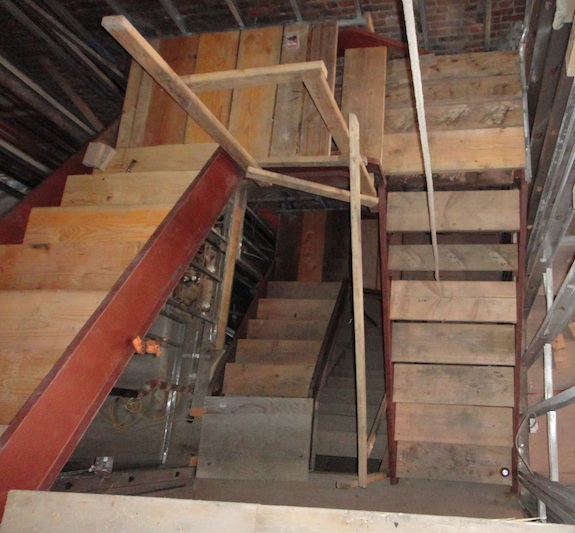
This past week work resumed and the most noticeable thing that got done was stairs. Another story of stairs went in and temporary treads went in all around. Here’s looking down – you can see the the progress so far…

steel & wood stairs from above

When it’s all done the steel will be painted white and there will be white oak treads. We were thinking of doing a gun metal blue finish on the steel, but it was complicated, rust prone, and visually it was a distraction. The stairs are supposed to be about the plexi side panels and the old joists that will create a screen along the stair hallway. A gun metal blue finish on the steel would have been distracting.

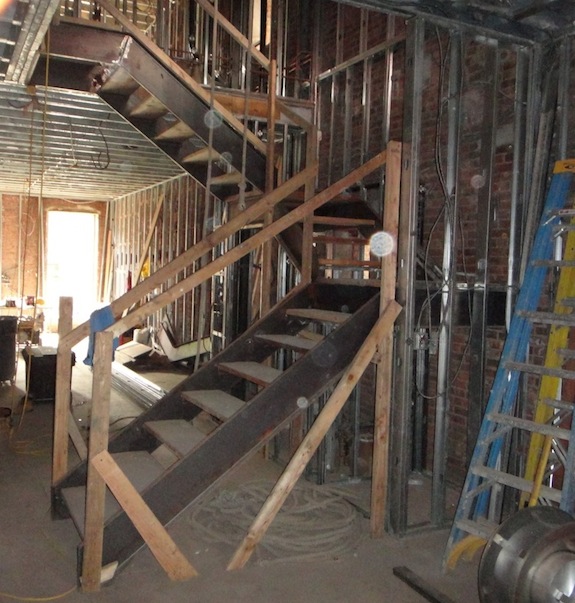
Here’s looking at parlor from the kitchen (in the front of the building), towards the dining & living room in the rear… (the temporary construction stairs are finally gone).

Steel & wood parlor stairs - looking from front to backAnd looking the other direction from the living/dining room towards the kitchen…
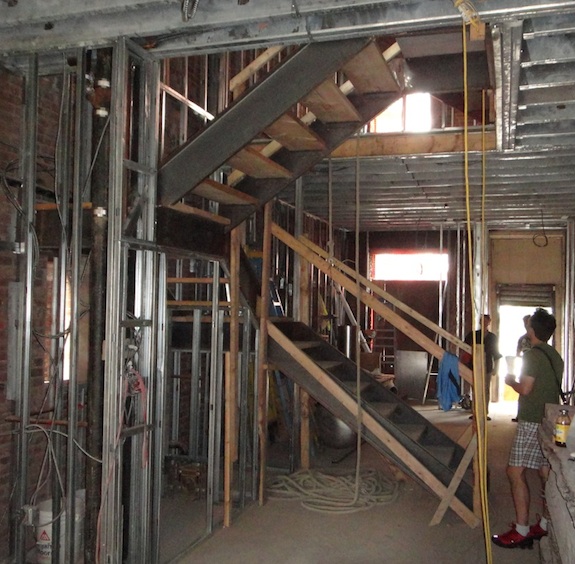
Parlor stairs looking towards kitchenYou can’t see it clearly, but there will be a bathroom under the stairs.
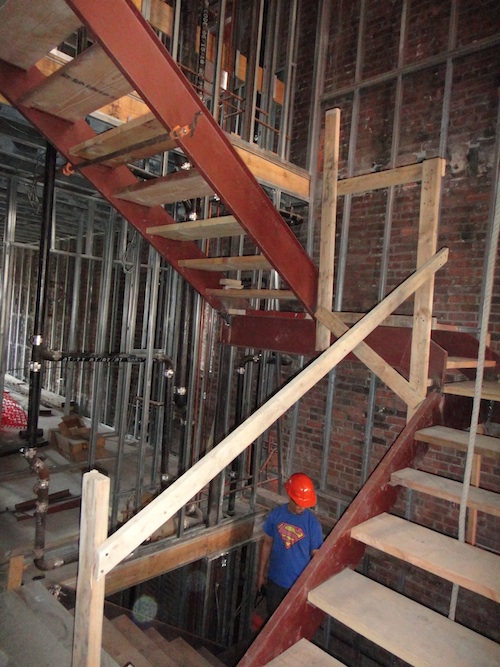
That steel was done before we decided to paint the steel. On the floor above they’ve primed the steel so it looks red…

Steel stairs primed redAnd looking from the other corner you can see down the stairs more easily…
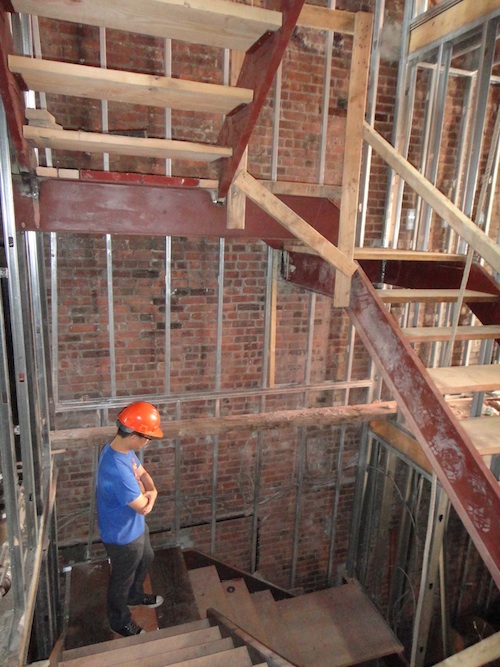
Steel stairs going from 2nd to 3rd floor in Harlem townhouseProgress has also been made with the stairs in the rental unit going from the basement to the cellar. I’m not sure why they’re not in completely, but here’s where things stand so far…
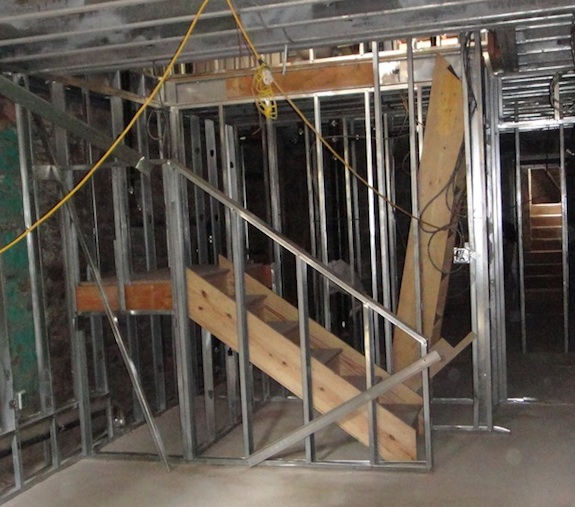
Wooden cellar stairsThe contractor also put the gutter and downspout on the building, which will stop much of the water from getting into the building. Rain water was sheeting off the roof and hitting the window sills as it went down the building at which point much of it was getting in the building.
A few other things have gotten done but those are the major items. Hopefully we’ll get our sprinkler approval on Monday at which point things will really pick up again.

Before & After: Repointing The Back Wall

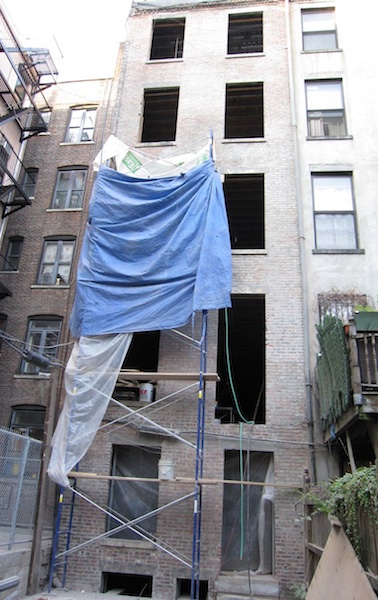
They haven’t taken down all the scaffolding in but it seems they’re done with repointing the rear façade and things are looking leaps and bounds better than they did when we started the project…

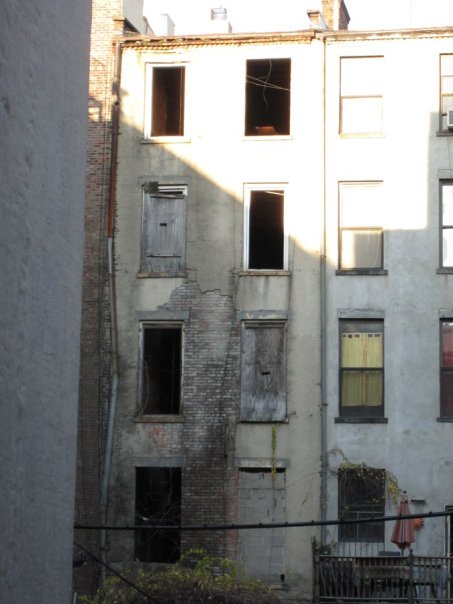
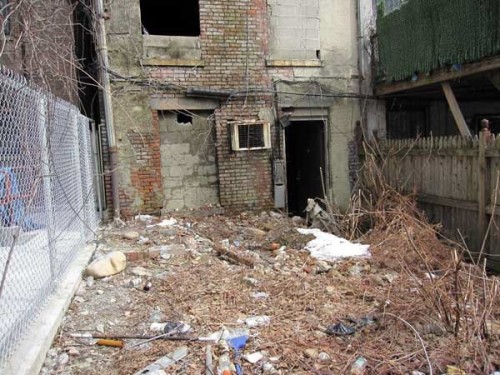
Here’s what it looked like initially…

Rear wall on townhouse shell in Harlem

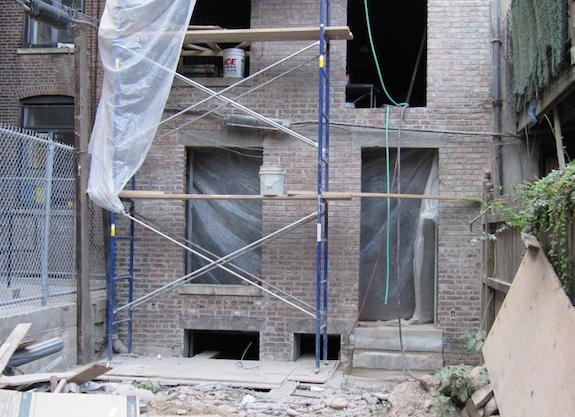
And here is what it looks like after the repointing is done…

Ground floor rear repointed - townhouse renovation

There was so much garbage in the yard when we started you couldn’t even see the cellar windows! It’s looking very neat and tidy now – as it should… And notice that you can’t even tell where the opening for the air conditioner used to be. There used to be parts of that wall that I thought could collapse – that’s no longer the case – it’s back to being a completely solid wall.

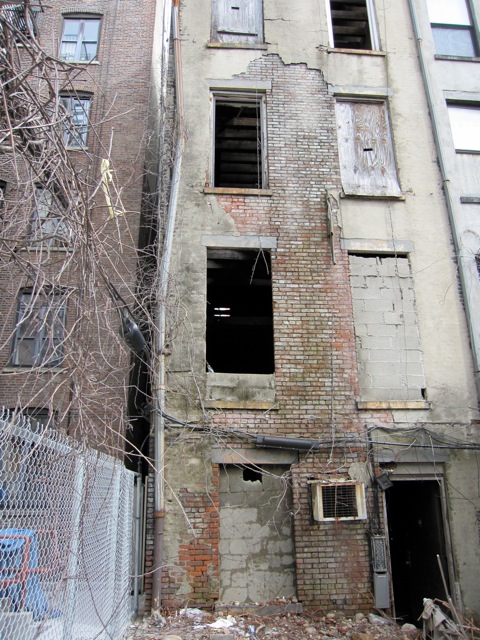
Here are some other before and after shots…

dilapidated rear wall on harlem townhouse shell

stucco falling off harlem brownstone shell

And what it looks like now…

Repointed rear brick wall on Harlem townhouse

The one thing that didn’t quite go how we had hoped was mortar color. The original color was a pinkish yellowish tan color that looked very sandy and had a high lime content. They just don’t make mortar like that anymore. Well, they can, but there are better ways of making mortar (with cement mixed in). The issue is that the base color of modern, cement-based mortar is gray, not a tan/sandy color. I’m not sure we could have achieved the original color if we had tried. Dan wanted to mix red into the mortar so the mortar would be closer in color with the brick, but even that wouldn’t have been the original color. In the end the contractor just went with the standard gray color. If it were a front façade I think we would have been pickier about the color, but the fact of the matter is that it’s the back of the house and it looks fine.

One thing I should mention is mortar type. There are several types of mortar and they vary by how strong they are…

Type M: 2,500 psi
Type S: 1,800 psi
Type N: 750 psi
Type O: 350 psi
Type K: 75 psi

You would think stronger would be better, but on historic structures the opposite is actually true. Old bricks are softer than modern brick and if you use a mortar that’s stronger than the bricks, when the wall needs to move the weakest part of the wall will be the bricks and they’ll crack before the mortar. That’s the opposite of what should happen – the mortar is supposed to give way before the bricks. After all, the mortar isn’t that difficult to replace, but the bricks are historic – you want to preserve them. You may think it’s not a big deal but think about the fact that a southern facing wall, like our rear wall, will expand slightly every afternoon due to the sun’s heat and then contract at night. Over time that can destroy your bricks if your mortar is too strong. Typically Type N mortar is what should be used on late 1800s townhouses like those in Harlem. Type S and Type M should never be used in walls with historic brick.

The NYC DOB Continues To Be A Problem…

Before the project started the biggest issues were with the NYC Department of Buildings. We thought we had pretty much everything worked out, but once again they’re holding up progress on the project for the simple reason that they can’t manage to get their work done in a timely manner.

The problem is the sprinklers. When the mechanical engineer reviewed what the architect had proposed (and gotten preliminarily approved) he found that there wasn’t sufficient coverage and we needed a lot more sprinkler heads. We finally got everyone on the same page and the new sprinkler job was submitted to DOB on June 28th. It took them until July 1 to get it entered into the system and assigned to a plan examiner. The DOB says that they’ll get the initial plan review done on new jobs within two weeks. Well, today is 3 weeks since the job was submitted and the initial plan exam still isn’t done. I check the job status once or twice a day but it still just says “Assigned to P/E”.

The problem is we can’t do the new water main connection until the sprinklers are approved and we can’t get electrical and gas into the building until the water main connection is done. So we still have no running water and no electricity in the building. It’s amazing how much has been accomplished without water and electricity, but things would move a lot faster if we had them.

The issue is that there’s a decent chance they’ll come back with objections and then it will be at least another two weeks before we can get those resolved… It just never seems to end with DOB. Yes, we could self-certify, but that’s a dangerous thing to do in this case since if we’re wrong we might have to do the water main connection all over again (big $$$).

NYC’s Department of Buildings just seems like more of a hindrance than anything else. It’s one thing to enforce rules, it’s another to just arbitrarily slow down projects…

UPDATE:

We finally got the list of objections. Here they are…

DOB Sprinkler Objections

68 heads? We don’t have 68 heads, we have 38 heads. All our documentation says 38 heads. The plans show 38 heads, but apparently we got rejected because the plan examiner couldn’t be bothered to get it right. He says the cost estimate is missing. It’s not. He says the certificate of no harassment is missing when it’s clearly available in the parent job for the sprinkler application. And now his objection is that we have 68 sprinkler heads.

Honestly, he just didn’t seem to care enough to get it right. Welcome to the NYC DOB. Meanwhile our project is delayed.

UPDATE #2:

The mechanical engineer chimed in and told us “<name of plan examiner> has never reviewed a set plans correct[ly]”. He then went on to detail for our expediter exactly why everything was fine and should have been approved. In other words this entire problem is because of an incompetent plan examiner. We have a meeting with him on Tuesday morning. Hopefully he’s not obstinate as well as incompetent.