The Soundproofing Challenge

The other day someone asked me what I would do differently if I had it to do over again. I gave a few examples (the biggest being to get water and electricity up and running before you start construction), but I’d add a better soundproofing strategy to that list. In our case it’s mostly an issue between the two units, though we are a bit disappointed in how you can hear footsteps on the floor above you in our unit. We’re scrambling to try to come up with a better solution for between the two units. In hindsight it’s something we should have taken more time to consider during the planning phase.

The main issue is that our living room is on top of our tenant’s bedroom. If we don’t take soundproofing seriously we’re going to have a very unhappy tenant every time we have people over for dinner or a party.

The first thing we did was an $800 change order to upgrade from fiberglass batt soundproofing to open cell foam soundproofing between the two units. I know there’s some debate about which is better. The fiberglass folks say fiberglass is better, the foam folks say foam is better. Fiberglass apparently has a better (or similar) STC rating (Sound Transmission Control), but open cell foam is supposed to be good at blocking mid-range frequencies like voices. But, that said, we’ve noticed you can still hear voices through the open cell foam – which worries us. Mind you, the ceiling/floor isn’t finished – it’s just a plywood floor subfloor plus the 5+ inches of foam at this point, but we figure we need to do more.

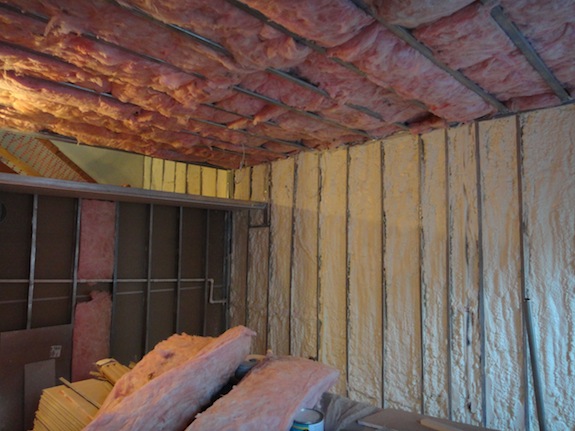
The next big thing we’re doing is metal channels that hang perpendicular to the floor joists. Between the joists and the metal channel is sound proof caulking/foam. Here’s a picture of the channels…
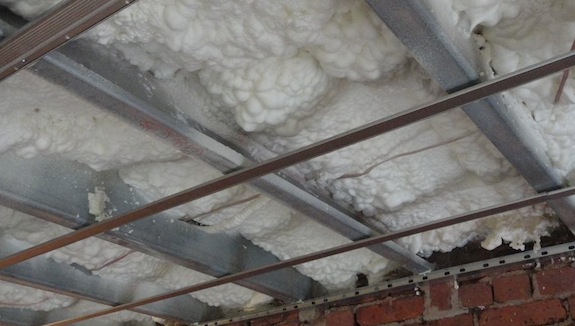
acoustical ceiling framing

You can also see all the open cell foam in the picture above.

The channels screw into the joists on one side and then the sheetrock screws into the channels. Because the channels are just screwed on one side they bounce a little – that bounce is a good thing when it comes to sound.

I’m pretty sure we need to put two layers of 5/8″ drywall on the ceiling since the ceiling has a 1 hour fire rating. So there will be more sound proofing foam between the layers of sheetrock and all the mass of the drywall will really help cut the sound as well.

With any luck our tenant will sleep soundly – even when we’ve got guests over…

Update:

Two layers of 5/8″ drywall have gone in on the ceiling and things are MUCH quieter now. They still need to tape and do the wood floor, but so far voices and footsteps are significantly muffled – though still sorta audible. And the resilient channel does indeed help things. When I walk across the floor with heavy boots Dan could tell when I was over the section with channel.

No Heat Needed

I went to the house rather early yesterday morning – at about 7:45, just after the sun came up. I walked into the house and it was pretty warm inside despite the fact that it was 42 degrees and windy outside and we don’t have heat in our building yet. Given that the sun had just come up the warmth wasn’t due to solar heat gain either…

Besides a few light bulbs on, and a small heater down in the uninsulated part of the cellar (to keep the pipes from freezing) there wasn’t much the the way of heat sources, yet the house was still warm. It was a little on the chilly side, but we like that – that’s pretty much how we want to keep the house during the winter months. Cold enough to warrant wearing a light sweater or hoodie, but not so cold that our hands get cold.

It appears the heat was coming from the building next to ours – 166 West 123. Despite the fact that 166 is sandwiched between two cold, unheated shells it remarkably has no insulation in the party walls. I can’t imagine what their heating bills must look like – they’re radiating so much heat that it’s enough to keep multiple buildings warm. All the buildings next to them have to do is insulate well and trap 166’s heat.

I would feel guilty about having our neighbor heating our building for us but it’s costing them less than when our building was open to the elements and the party wall was freezing cold. The core principles of conservation are Reduce, Reuse, Recycle. To that end we’ve Reduced our neighbor’s energy usage, and Reused their radiated heat. It’s pretty much a win-win.

Even without a sweater I found the temperature yesterday to be pretty comfortable. What that means is that we probably won’t need to turn the heat on in our building until it gets down into the 30s and even then it doesn’t look like we’ll need much heat.

The moral of the story is closed cell foam is pretty incredible – and while it’s a bit more expensive upfront, it’ll save us far more money than it cost.

UPDATE:

It’s gotten colder since I wrote the post and I’ve figured out the house is comfortable down to roughly freezing. I was comfortable at 35 degrees outside with a 10 mph wind, but it was maybe 5 degrees too cold when it was 27 outside with a 14 mph wind. Even at 27 out the temperature wasn’t that bad. A hoodie or sweater would have made it comfortable enough except hands would have been a bit cold. And as a temperature for sleeping – it could even get colder inside with a proper down or wool blanket.

UPDATE #2

Today we finally got thermometers. The temperature outside was 32 degrees but inside it was 51 degrees on the parlor floor (the coldest part of our unit) and 52 degrees near the window in the cellar of the rental unit (the coldest part of the rental unit). That’s pretty sweet – we get 20 degrees of heat off light bulbs and from the warm wall with the neighbor. We also noticed at lower temperatures the heat gained is even more.

I think I’m going to be pretty comfortable with the house set to the high 50s during the day and the high 40s at night. That means we won’t need to turn on the heat until we’re in the high 30s (day) or below freezing (night). We’ll see what temperature we can get away with when we actually move in…

It Feels Like The Beginning Of The End

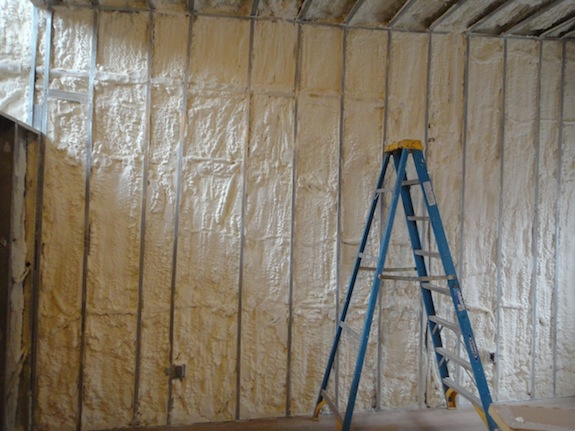
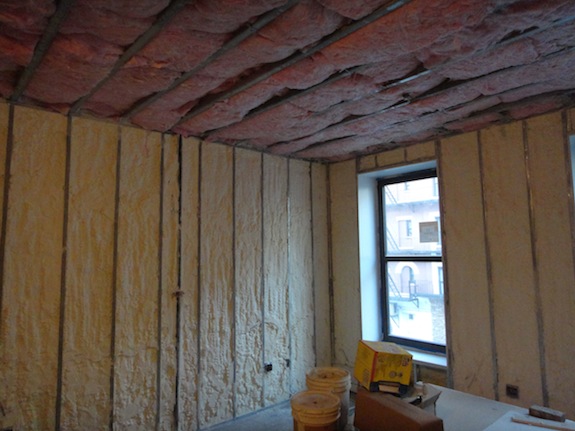
While the closed cell foam has been going in for a few days, yesterday when we went to the house the place just felt different – like it was the beginning of the end. Fiberglass sound insulation has been put in, and now when you walk through the house you don’t see the guts of the house so much. We’ve got yellowish white walls and either pink or yellow ceilings…

fiberglass sound insulation and closed cell foam

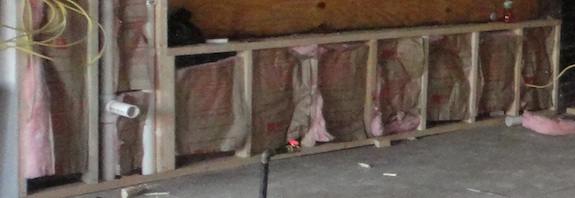
There’s still a little more to do (they missed a few walls – like the one in the picture below), but in general it looks great and it transforms the feeling of the house. Walking through the house is so different now – everything is just quieter and more muted and cozy.

sound insulation in the den

[If you’re wondering, the PVC you see in that wall is the condensation line for the A/C.]

One issue which I thought of just at the right moment was the sound insulation between the rental unit and our unit. When I thought about sound I realized our living room is right above their bedroom. I mentioned it to the contractor who mentioned it to the insulation sub-contractor and an $800 change order later we went with 5″ of open cell foam in the ceiling between the two units.

Open cell foam looks like closed cell foam, but it’s much softer – it feels like a fairly soft foam pillow. While closed cell foam is good at stopping thuddy sounds like someone walking overhead and the bass from a stereo, open cell foam is good over a broader range of sounds. Still, even with the open cell foam you can still hear people talking through the floor, but we still need to put the wood floor on and the ceiling below – that will improve things. I’m temped to put a second layer of drywall with a closed-cell-foamish sound proofing layer between the two layers for even more sound reduction – we’ll see.

So starting next week drywall should be going up pretty quickly. That will transform the house even more.

A White Christmas (w/ Closed Cell Foam)

The house is turning white just in time for Christmas… No, it’s not snowing – this (yellowish) white Christmas is thanks to closed cell foam…

In other words our house is turning into a big styrofoam cup. 🙂  And actually it was sorta snowing in the house today – as they cleaned up this powdery foam fell down the staircase – much like snow…

The other day someone asked us what about the house was “green”. I always hesitate when people ask me that question – I don’t do things just because someone calls them “green”. For example NYC requires low VOC floor sealers which these days means water-based sealers. But traditionally oil-based sealers perform better than water-based ones. I’d have no problem shipping high VOC oil-based sealer in from Pennsylvania if it means our floors will be more durable. In that particular case we were convinced to go with a low VOC water-based sealer because the modern sealers have epoxy-like hardeners in them that make them perform better than the old oil-based sealers.

So I’m not green just to be green, but I am definitely green when it increases efficiency, durability, etc. (provided it doesn’t compromise on the end result). Insulation is a huge part how our house will be green since, more than anything else, it can reduce energy usage through lower heating and cooling bills.

I had done my research ahead of time and knew that closed cell foam just performs better than the other alternatives. For starters closed cell foam has a much higher R value per inch than fiberglass – 6 to 7, compared to 3.14. Thinner insulation = thinner walls = wider rooms. But beyond that we’ve been told that closed cell foam has a real world performance that’s twice as good as fiberglass insulation with similar R value. So an R20 closed cell foam wall will perform about the same as an R40 fiberglass wall. The reason for that is pretty simple… R value ratings do not take air movement into consideration. Closed cell foam gets into all the nooks and crannies and creates a seal – there’s no way for air to get around the insulation. In contrast air can travel pretty easily around fiberglass batts.

To illustrate that point I went with a friend a few months ago to see a place in Brooklyn that was under construction. They were insulating, but in the most haphazard way possible… There’s no way the wall below is going to perform very well – look at the huge gaps in some areas and how it’s squished the fiberglass is in other areas.

sloppy install of fiberglass batts

In contrast closed cell foam tends to be a little oversprayed – so if anything it will perform better than expected and since it creates a perfect seal all over the wall – there’s no problem with air passing through the wall.

So sealing the house up really tight should drastically reduce energy consumption. Over time that will save us money and pay for the increased cost of the closed cell foam.

If your curious, here’s how the floors and walls are being done. NY State energy code requires R19+ walls and R39+ roofs (I think those numbers go up if the building is heated with electric). [And I should mention, if you’re landmarked or on the National Register you’re exempt from energy conservation rules. But seriously – if insulation will save you a substantial amount of money, why wouldn’t you want to insulate properly?]

insulated wall

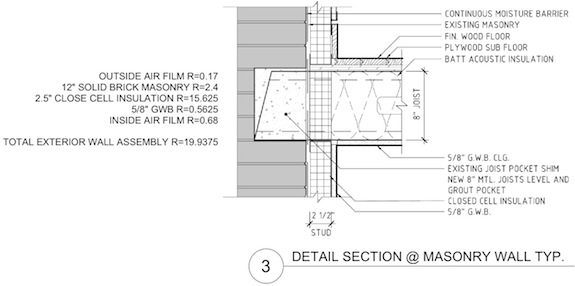
That’s 2.5″ of closed cell foam, plus the R value of the brick, etc. gives us R20 walls. Actually, the R value of the brand we’re using is slightly higher than the architect expected, so we’ll have R21.5 walls.

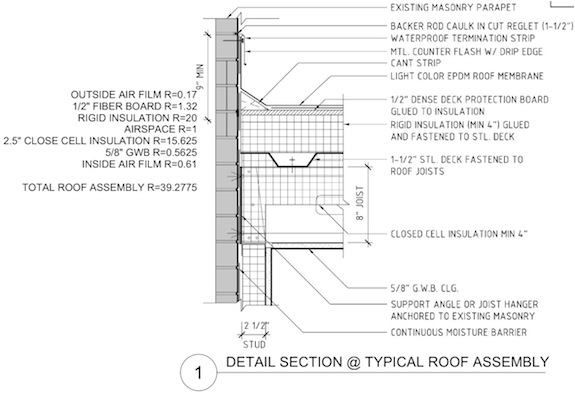
insulated roof

That’s 4″ of rigid foam above the roof deck (rigid foam is similar to closed cell – except it’s not sprayed on and hence isn’t as air tight), plus 4″ of closed cell foam in the roof joists.

If you look closely at the image above you’ll see an inconsistency – the calculations say 2.5″ of foam, the detail drawing says 4″. I didn’t catch that until earlier today when they’d already started insulating. On top of that the insulation guy put 5.5″ of closed cell (R38) in his estimate, so our roof will be more like R61.5 with about R41.5 in the bulkhead. That amount of roof insulation is actually almost absurd – R60 is what “zero energy” homes have. With 3″ of closed cell foam you get 97% of its potential efficiency. So with 9.5″ (including the rigid insulation), most of our roof has got to be pretty close to 100% efficient.

The other thing closed cell foam does is reinforce the structure of the house. Because it becomes rather hard when it drys and because it fills every nook and cranny it actually becomes somewhat structural – all without adding much weight. We were told it can make a typical wood frame house 40 times stronger than normal which makes it popular in hurricane zones. We’ve got brick walls, so that’s not a big factor – but it can’t hurt.

The one downside to closed cell foam (other than cost) is that you have everything in your walls completed perfectly before you spray on the foam. Going back and fixing something you didn’t quite get right is incredibly difficult.

One thing we should mention is closed cell foam on brick walls. We were told by one insulation sub-contractor that old brick would suck up the equivalent of 1.5 inches of foam. But it turns out that was just wrong. The closed cell foam expert that we’re using says the foam is applied at 150 psi and starts drying and hardening almost immediately. It doesn’t really have time to get sucked into the brick.

Don’t Put Closed Cell Foam On Brick

We’re using closed cell foam for insulation on all exterior walls and in the roof (which also has rigid foam). If you’ve ever been on a boat and seen foam cushions that have a smooth shiny surface to them – that’s closed cell foam. Open cell foam is more like a sponge. Closed cell foam doesn’t absorb water, but open cell foam does.

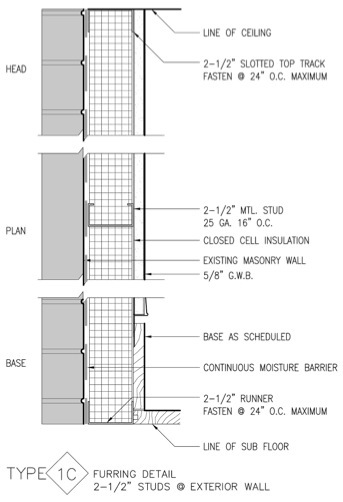
When our architect spec’d things he said there should be a moisture barrier between the foam and the brick wall. Here’s his detail…

insulated brick wall detail drawingNotice his note for a “continuous moisture barrier”. Basically “moisture barrier” is a fancy term for a sheet of plastic – there’s not much high tech about it.

Well, when the contractor started framing the walls he didn’t put up the moisture barrier. He hadn’t really noticed it in the drawings and on other projects the moisture barrier had gone on the inside of the studs – between the studs and the drywall. We tried to push back, but wound up giving in. Since closed cell foam is a moisture barrier we said he could skip the moisture barrier if he wanted to.

Not putting the moisture barrier in has turned out to be a bad decision on the part of the contractor. He had the insulation subcontractor in today and she said the brick will absorb the equivalent of 1 1/2 inches of closed cell foam. So to get 2 1/2 inches of depth she has to spray 4″ of insulation (which means she’ll charge for 4″ of insulation).

I also worry about what all that absorbed foam will do to the brick, so I’ve asked the contractor to put the moisture barrier in. It won’t be very easy now that there’s all sorts of plumbing and wiring in place, but it sorta just needs to be done…

So word to the wise – if you’re using foam insulation, put a moisture barrier over your brick before you start framing the walls.