How Do You Get The Sprinkler Pipe Into The Joists?

Yesterday we stopped by the building to talk to the contractor. During the day I had realized something that was fairly serious… The plans call for the sprinklers to be recessed into the ceiling. But I couldn’t imagine how you’d get the sprinkler pipe threaded through the joists. Even if you could do it while the joists were being installed the sprinkler subcontractor hasn’t done the engineering yet to determine what size pipes go where.

So when I got to the job site one of my first questions to our contractor was “So how do you get the sprinkler pipe into the joists?” There was just a blank look on his on our contractor’s face (initially). First he suggested visible sprinkler pipes, but I said ‘no’ and that Dan would go ballistic if we had to do that. His foreman (vice-president) was standing there and suggested the sprinkler pipe be run along the side and hidden with crown moulding. I reminded him we weren’t putting in crown moulding. He said, well, I guess we’ll have to put it in. I just shook my head ‘no’. Crown moulding just doesn’t work with the aesthetic we’re trying to achieve.

The contractor then said that usually sprinkler pipe is run inside a “second ceiling” – in other words they hang wall studs below the joists and run the pipe in there. BUT that hadn’t been calculated into the floor-to-floor heights that we needed to achieve 8′ ceilings. Needless to say, I was really glad that a moment before he had told me that it looked like we’d get 8’2″ to 8’3″ of ceiling height on the basement level (the rental unit) – we might need that 2 to 3″ for sprinklers.

I then called the architect and he said one other option is to notch the bottom of the joists, put the pipe up into the joists and then patch the bottom of the joist so it regains it’s strength (something you can only do with metal joists). Doesn’t sound like an optimal solution, but at least we have another option.

So it looks like we have two options. One is to lower the ceiling a bit and run the pipes below the joists. The other is to cut into the joists and then patch the bottom of the joists. I’m just glad I thought of it when I did. I’d rather be having this conversation now – when there’s just 1 and a half floors in – than when all the floors are framed. It’s also good that it came up on a Friday. Now the contractor has the weekend to think about it and talk to his plumber. Perhaps the plumber has seen another solution that we haven’t though of yet.

It’ll be interesting to see how it gets resolved…

UPDATE:

After writing this I thought up one more solution I like better than the other two… Run the “trunks” for each floor in the western wall. Then run “branches” up and into the joists wherever a head is required. The only complication are heads opposite stairwells, but I think we can work solutions for each of those locations.

FINAL SOLUTION:

It’s now 5 months later and the sprinklers are being put in. The solution was to run short sections of sprinkler pipe through the joists. Here’s a picture showing what I’m talking about (click to see bigger version)…

sprinkler pipe through metal joistsHowever, our plumber only seems comfortable doing that with the smallest diameter pipe. He didn’t want to run any main lines through the joists. So instead of having one sprinkler riser going up through our plumbing wall we have two smaller ones – one for the back of the building and one for the front of the building. Then there are branch lines off of those that either run through the walls or run parallel with the joists. Using that strategy only thin (1″) pipe needs to be snaked through the joists.

The first floor…

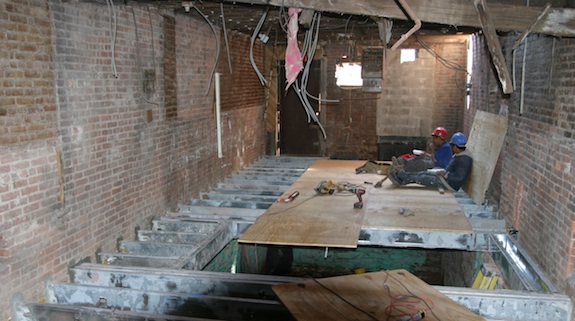
We stopped by the house yesterday to check in with our contractor and the subfloor was being put down between the cellar and the basement. It felt weird to walk into the building on an actual floor – even if what I was walking on was just plywood thrown onto joists.

The first of the floors to go into the house

I’m standing about 1/3rd of the way into what will be the rental unit. The hole you see is where the stairs will go so the tenant can get down into the cellar – the tenant will have “accessory space” down there they can use as a workroom, a den, a media room, etc. The workers are sitting (to each lunch) in what will be a bedroom – more or less where the bed will be.

I need to check next time but I think the new joists make it so the back door can’t be opened since we’re raising the floor a few inches. Where the workers are sitting will be where the tenant will put his/her bed. The window in their bedroom (currently blocked up) is quite large – 3’9″ x 5’10”. It’s south facing so it (and the door next to it) will let in tons of light, though we will have a 4′ deep deck outside that will give them some shade.

The big hole between the door and the window is where a previous occupant cut a hole for an air conditioner. It’s only supported by the air conditioner sleeve that’s in there – so a bit precarious. Needless to say that’s high on the list to get fixed.

Our front doorYou can see where the upper part of the wall has been sealed. We went next door to meet the neighbor and saw saw that that they have what we used to have – a half wall on the bottom and exposed brick on top. The half wall is where electrical wires ran, etc. We’ll be having full (insulated) walls on the exterior walls and a completely exposed wall on the party wall.
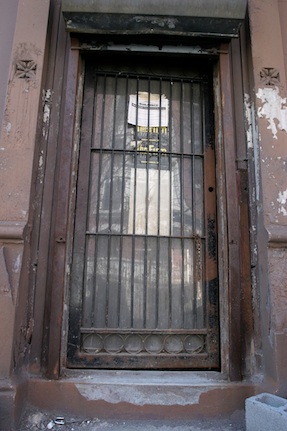
Our contractor cut the lock on the front door, so we also saw our front door for the first time yesterday (right). It needs a paint job, but it’s pretty solid – though it does make you feel like you’re going into a fortress or something. Still, it’s way better than the crappy door that was there in the 1980 tax photo. We’ll be taking it out and putting in a door that more-or-less replicates the original french doors that were on the building.

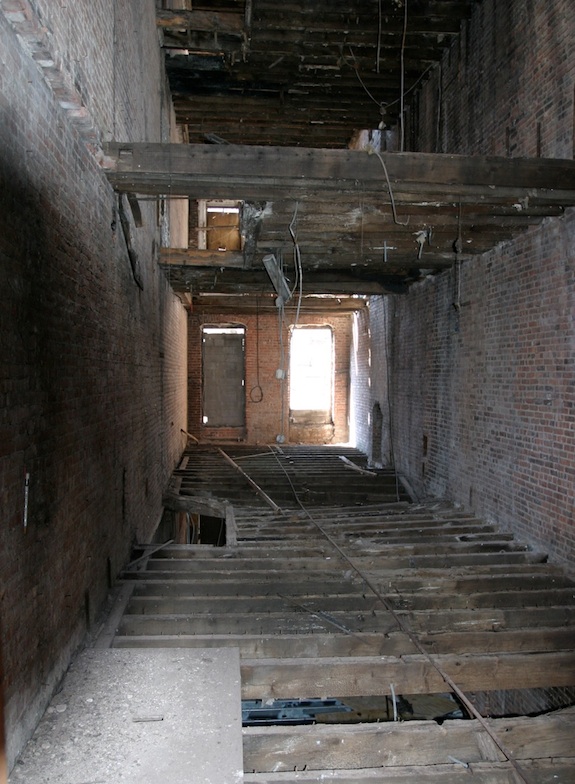
Since we now have access to the front door, we can see what our parlor floor looks like…

The parlor floor of a Harlem brownstone shell - before renovation

As you can see by all the sagging, the joists are in poor quality here too…

There will be a kitchen to the right just inside the front door. Then a central staircase wrapping around a central core. Then the dining area and then the living room in the rear.

We’ll be making the window on the left into a door and there will be a small 4′ deep deck going across the house. The deck will have a pergola  so we can have vines grow up that will give us some shade in the summer. There will also be stairs down from the porch into the garden. The window on the right is even bigger than the one in the basement – 3’9″ x 8′. That (and the door) will give us tons of light in our living room since that’s a southern exposure. The window will be a tilt-n-turn, so it can open up completely like a door (only it doesn’t go all the way to the ground). With the window and door open the living room will feel completely connected to the outdoors – which should be nice when the weather is mild.

Here are a couple other cool shots taken from the front door…

Fireplace openings in a brownstone shell in Harlem

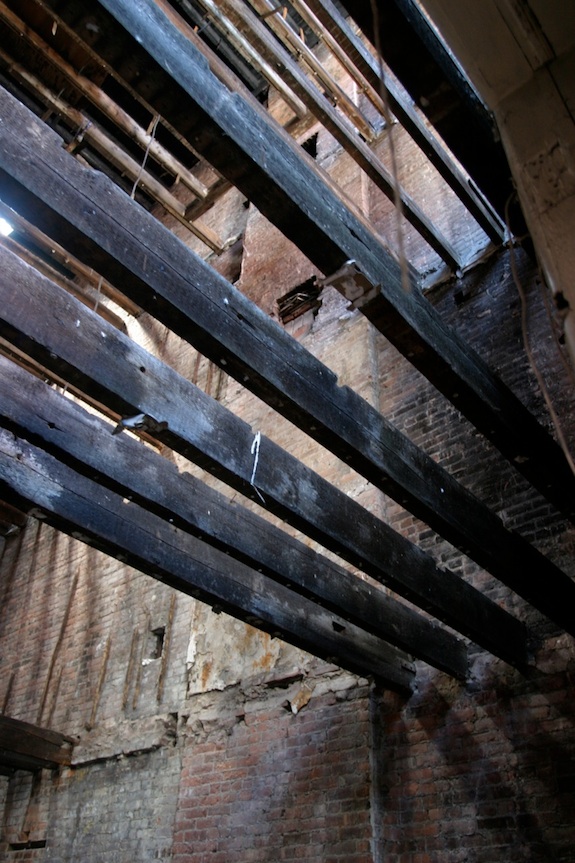
Notice in the picture below that even the “good” joists have had things done to them that severely weaken them. You can see a notch out of the top of the joist – typically done to run wires. If you put a 2″ notch in a 10″ beam that makes it the same as an 8″ beam – severely weakening it. If you need to run something through a beam the hole should go in the center of the beam.

Inside of gutted townhouse shell in Harlem

Cool Under Construction Photo

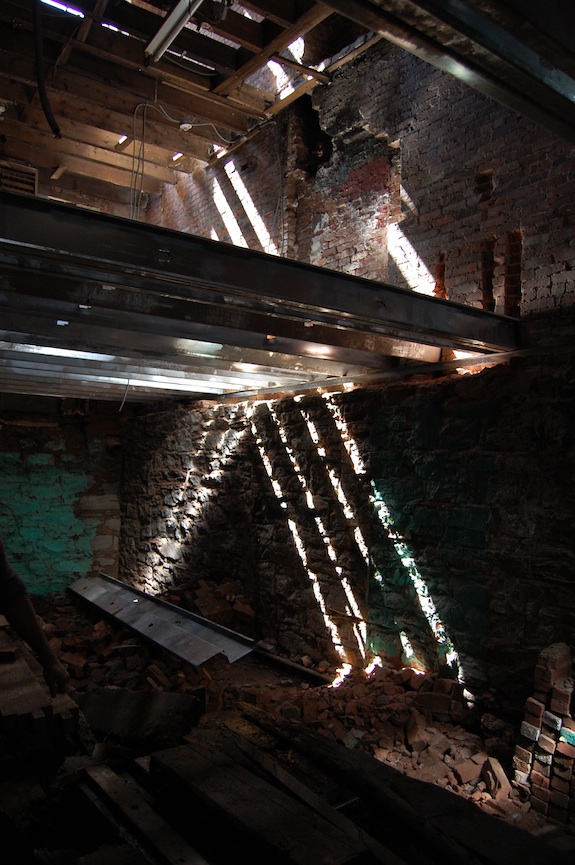
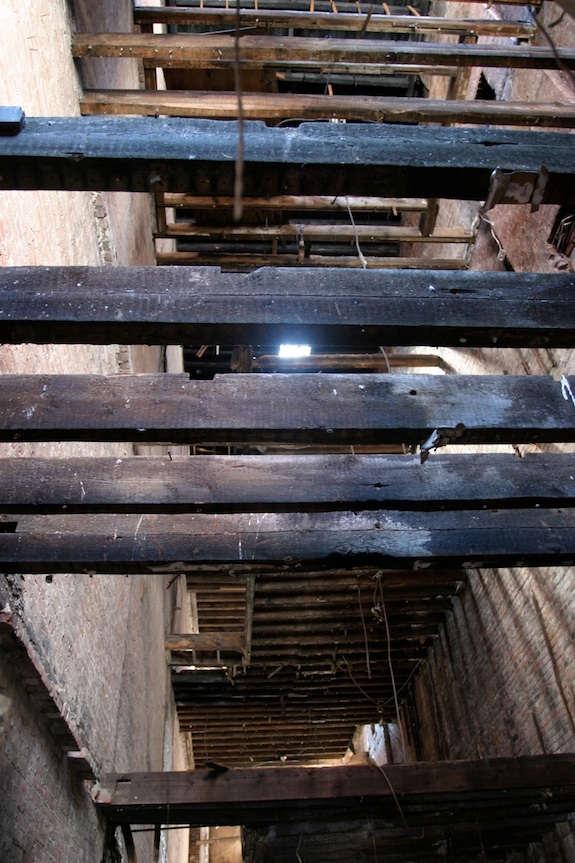
This past Saturday we had architecture students from CityTech come see the house. Dan’s a (web design) professor at CityTech and one of the architecture professors (Ken Conzelmann) took the photo below. I think it’s pretty cool – with the light streaming through the joists it’s quite beautiful…

light streaming in a townhouse shell

I love the height of everything, but of course that will go away with the renovation since floors will go in.

The “hole” in the wall is an old fireplace. The previous owner (a developer/landlord) had pretty much ripped it out. We’ll fill the hole back in with brick to make the wall stronger.

You can also see that we’re raising the floor between the cellar and basement to give a full 8′ clearance in the cellar. The joists used to rest on top of the foundation – now they’re a few inches higher.

WSJ Editor Moves In After Renovation

For those of you who are looking for what it really costs to renovate a townhouse – Julia Angwin, an editor at the Wall Street Journal, has been blogging the renovation of her brownstone that’s an avenue and a half from ours – just down 123rd Street, west of Manhattan Avenue. Well, she’s “done” and has moved in…

Her blog is one of the few that discusses cost. She and her husband bought the place for $800K in February of 2010 – just a month before we bought our place. Their townhouse is 16′ x 60′ x 4 stories – so 3,840 sq. ft. That means she paid $208/sq. ft. That may seem a little high, but theirs was not a shell – just a place in need of major renovation.

Their renovations were estimated to cost $350K, but wound up costing $420K ($109/sq. ft.) They went 20% over budget in part because they jumped right into renovations with very little planning. They hadn’t planned on replacing the roof (only patching it). They hadn’t planned for a back deck, etc.

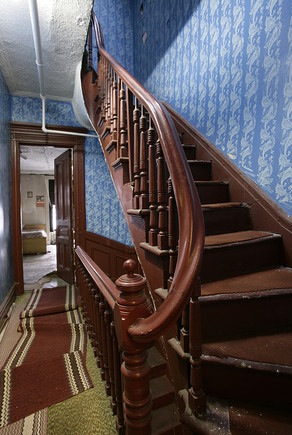
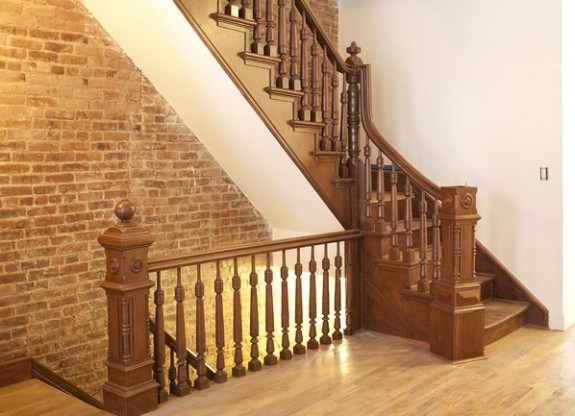
Stairs in Julia Angwin's house before renovationSo they say they spent $1.22M in total. Let’s call it $1.25M since I’m sure there were at least some costs that weren’t reported. That means their total investment was $325/sq. ft. which is very close to what I estimate our cost will be when we’re done – the difference is they’re moving in after 13 months and we’ll move in after 21 months (if things go smoothly).
One thing that should be noted is that they’re not really done yet. They still need to get a new C of O. Without a new C of O they can’t legally rent the basement apartment. Apparently, the process of getting a C of O can be a bit tortuous. I wish them the best, but there are things I don’t quite understand about what I see online concerning their renovations. For example, I’m a little confused about their sprinkler situation. Their Alt-1 filing says there were no sprinklers in the building, but I see them in the “before” pictures – so not sure what the story is with that. I think I see flush sprinkler heads in some of the after pictures – but I’m not 100% sure whether they’re there or not. The Alt-1 doesn’t mention sprinkler work. I’m guessing because they were spending less than half the value of the building on renovations they got in under more lenient rules. I just hope they don’t encounter major problems with their C of O inspection.

Anyway, here are some before and after pictures… I love the picture of the stairs (above and right)… I actually really love the blue wallpaper and how it combines with the maroon and green in the picture. Not sure I’d want to live with it, but it photographs beautifully. There were actually quite a few interesting colors in the house before renovation. On other blogs people have criticized her for stripping the soul out of the place. Personally, I think it just needs a little color – most everything is now white. Here’s an after shot of the stairs. Unfortunately (IMHO) they removed the wainscoting…

The stairs after renovation

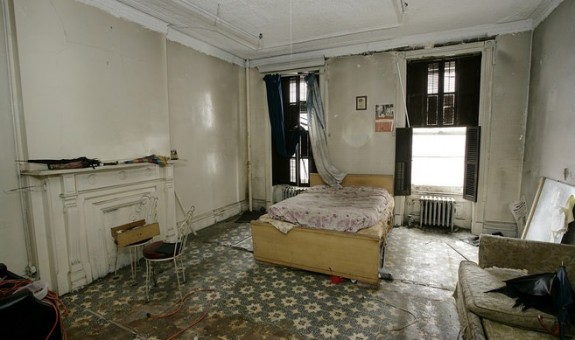
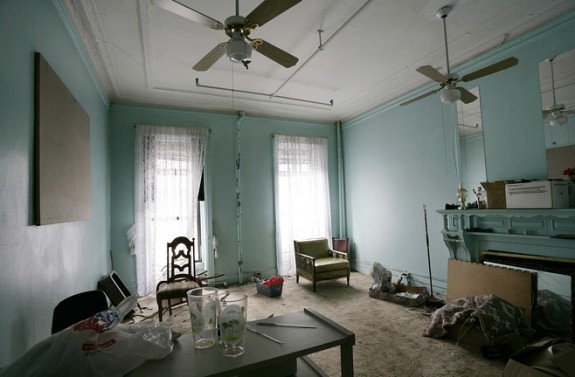
Here’s some of the rooms before renovations… Some of them make me want to shoot an art film… The rooms are beautiful in some respects, though I wouldn’t want to live in them – just pretty in pictures…

Here’s the future kitchen before…

Green room before renovation

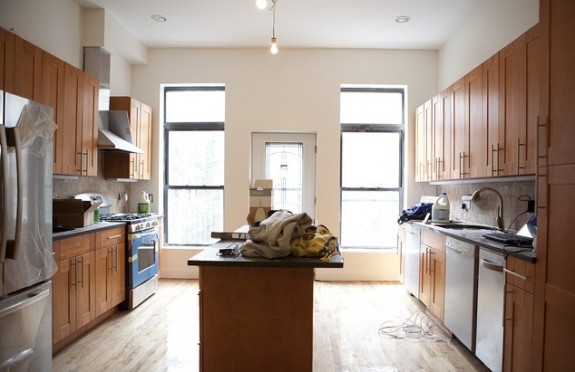
And the kitchen after…

Julia Angwin's kitchen

And another before shot…

Bedroom before renovation

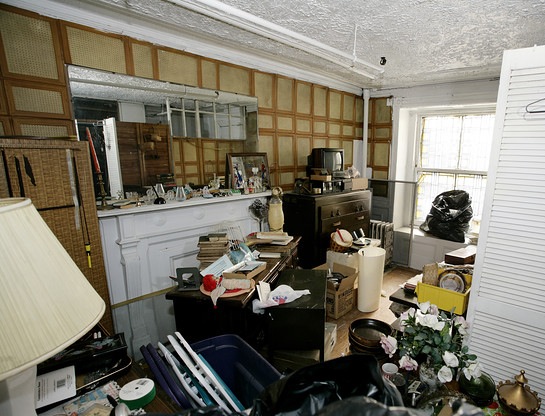
Here’s what will be the ground floor rental (looking forward)…

Messy room before renovation

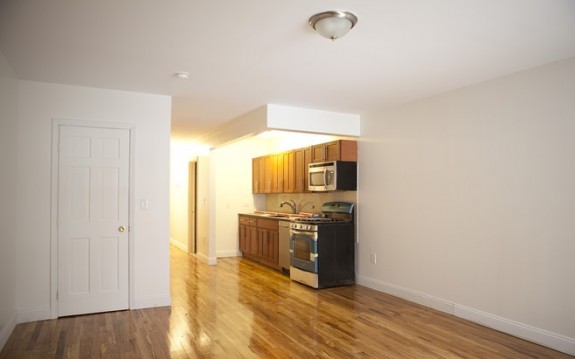
And the rental after renovation (looking back)…

Rental unit's kitchen

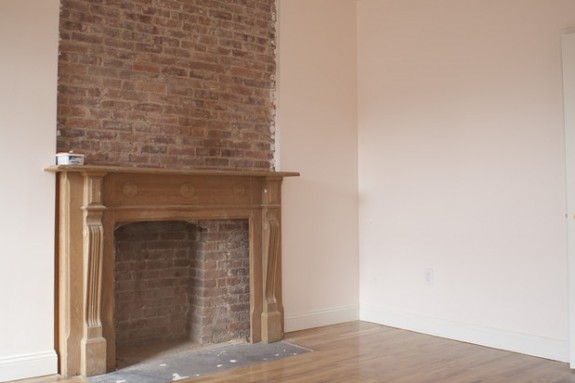
The fireplaces were something they took a lot of heat for in blog comments. They were concerned their kids would get lead poisoning from them, so they took all of them out and only left one in their master bedroom.

Fireplace after renovation

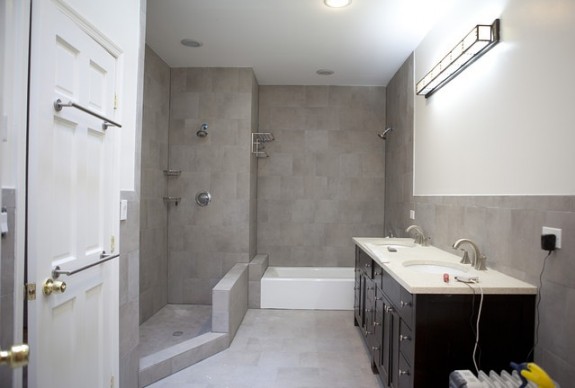
The master bath was another problem area. The glass hasn’t been installed around the shower so it looks a little bare right now, but the problem was the bathtub. The contractor didn’t leave enough space for the deep soaking tub they wanted, so they got a shallow tub which is useless – it’s not much good as a bathtub and they don’t need two showers in one bathroom.

Master bathroom with shallow tub

So that’s the type of renovation you can pull off in 13 months with a total investment of $1.25M. That gives you a 2,600 sq. ft., 4 bedroom owners triplex and an 870 sq. ft., 1(+) bedroom rental unit (minus space for stairs).

And as far as the payoff… CONSERVATIVELY her place is now worth $1.6M ($417/sq. ft.) so with $1.25M invested they just netted $350K (on paper), but it could very well be worth more – they’ve got an excellent location – very close to express trains and to Columbia University.

Harlem Townhouse Shells, Rehab Loans & Fannie/Freddy

At our mortgage closing the other day our loan officer made an interesting comment – “there are no jumbo rehab loans”. Jumbo loans are really big mortgages that are bigger than Fannie Mae or Freddy Mac are willing to insure. They’re purely a bank product. People can still get regular jumbo mortgages, but jumbo rehab loans simply don’t exist – the banks think they’re too risky. The line between “conforming” and “jumbo” is determined by Fannie Mae and Freddy Mac. Currently conforming loans in New York max out at $729,75o for a one family, $934,200 for a two family, and $1,129,250 for a three family. Where this comes into play vis-à-vis Harlem townhouse shells is that it limits who can buy and renovate shells and how the townhouses are configured. Let’s take a few examples and see how this plays out…

Harlem’s little townhouses – 12.5′ x 53 x 4 stories

Dotted all around Harlem are 12 1/2 foot townhouses where the original developer fit two homes on one 25 foot lot. These have 2,650 sq. ft. including the walls, 2,350 sq. ft. inside the walls (586 per floor).

If we assume $165/sq. ft. for an average shell, that puts the purchase price around $450K. Then add $530K ($200/sq. ft.) for a nice renovation and the total cost will be just under $1M.

Owners are probably going to want the entire house for themselves – 2,350 sq. ft. isn’t that much when you subtract the space taken by the staircases, etc. Since only $730K can be financed with a conforming mortgage that means the potential buyer needs nearly $300K in cash to make it work.

If the buyer converts it to two family then only about $100,000 of cash is needed, but then the buyer gets a pretty small space and won’t get much rental income since the unit will be pretty small.

The standard “smaller” Harlem townhouse – 16′ x 50′ x 4 stories

All over Harlem you see 16 footers that are roughly 16′ x 50′ x 4 stories (3200 sq. ft. total, 2880 sq. ft. internal sq. ft. internal, 720 sq. ft. per floor). These will probably cost $525K to purchase (plus or minus depending on condition and location), and cost $650K to renovate – so $1.175M in total investment.

Chances are the buyer will want to configure it as a two family – so they’ll need about $250,000 in cash to put down (minimum).

If they configure it as 3 family their unit will be less than 1,500 sq. ft. and they’ll lose the back yard and only have a roof deck (much less desirable for the owner). But then they only need about $50K down and they can go with low-money down FHA-backed 203(k) loan.

The popular 18 footers – 18′ x 55′ x 4 stories

18 footers are popular because they’re wide enough to have floor through rentals which are popular with developers. But putting developers into the equation ups the prices. They have about 3,950 sq. ft. (3,600 interior, 900 per floor). With developers in the picture I’d expect the cost to be around $710K for the building and $790K for the renovation – so $1.5M total investment.

Configured as a two family the owner would get 2,700 sq. ft. but would need $575K in cash to make it happen.

Configured as three family the owner gets 1,800 sq. ft., but loses the back yard and still needs $375K in cash to pull it off.

While a developer might make it 4 family, there’s really no point. The increased taxes on 4 family (compared to 3 family) and having just a small apartment make it not worth while to the owner.

The coveted 25 footers – 25′ x 52′ x 4 stories

25 footers are just elegant. The space in them is incredible – 5,200 sq. ft. total (4,800 internal, 1,200 per floor). Typically 25 footers have 12+ foot ceilings on the parlor floor so they just feel cavernous. They’re wonderful houses. But with that space comes higher cost… Probably $900K for the building, plus $1M for renovation for a total cost of about $1.9M.

The most spectacular configuration is an owner’s triplex over a ground floor rental. That would give the owner a 3,600 sq. ft., 6 bedroom house with substantial rental income from a legal two bedroom apartment. But they would need $1M in cash since the 2 family rehab loan maxes out at $935K.

The other configuration is two floor-thru tenants over an owner’s duplex. But with that configuration the owner still needs to come up with $775K in cash.

5 story townhouses

In each of the scenarios above it’s possible you could buy a 5 story townhouse instead of the more common 4 story. In some cases it makes adding a unit easier and more desirable since the owner’s unit will have an additional floor. But it ups purchase and renovation costs.

The bottom line

The bottom line is that the lack of jumbo rehab mortgages means that potential buyers either need a lot of cash or they need to be OK with not having a very big owner’s unit. That severely limits the pool of people who realistically are suited for rehabbing buildings. The other thing to note is that this is a bigger problem for bigger townhouses since the costs go up and there aren’t jumbo mortgages to offset the increased costs. Even the little townhouses can easily exceed the max amounts for conforming mortgages.

If you look at some of the posts I’ve had on what things are selling for you’ll notice the gap between shells and livable townhouses is bigger than you might think. I think part of that spread is due to what I just described above – the potential buyers for shells are limited because the loan amounts for rehab mortgages are limited.

But it gets worse…

The problem looming on the horizon is that politicians want to scale back Fannie Mae and Freddy Mac. If that happens it means no more Fannie and Freddy mortgages. There are proposals to make this happen over the next two to ten years. NYC already has increased loan amounts because we’re in a high cost area. As Fannie and Freddie get scaled back all of that will just go away. In fact people think 30 year fixed rate mortgages will go away if Fannie and Freddie are eliminated or severely scaled back.

The politicians who are advocating getting rid of Fannie and Freddie aren’t thinking about what it will mean to neighborhoods with blighted buildings – but it will have a huge effect. They understandably want to  stop the federal government from taking on such big risks, but rehabbing blighted neighborhoods is a risk I think it’s appropriate for governments to take on since even if the mortgages default the community benefits. If Fanny and Freddy go away it’s possible next to nothing will get rehabbed in Harlem – or the rehabs will only be done by developers – not by homeowners who are investing themselves in the community. I’m not saying Fannie and Freddie are perfect, but very few Harlem townhouse shells would get rehabbed without them.