The Return of The Happy Game Room

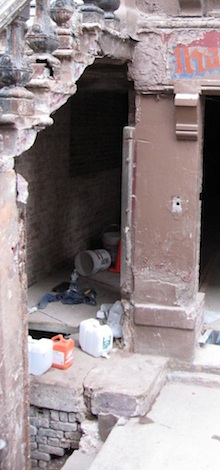
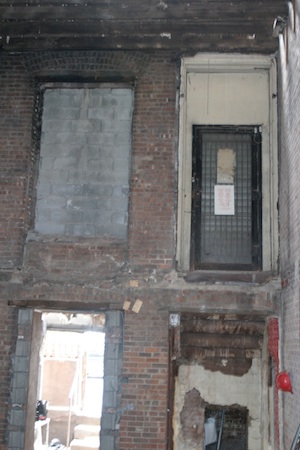
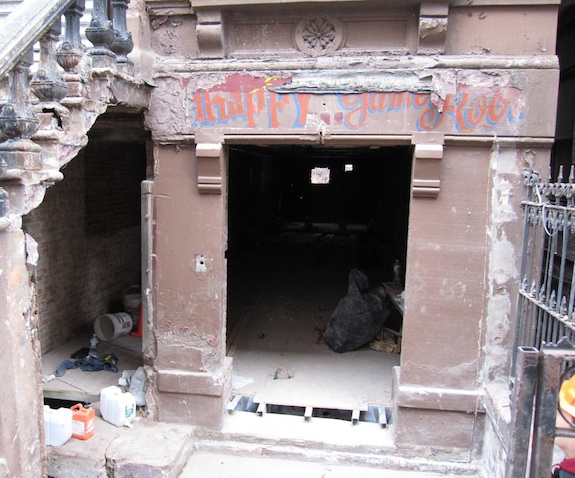
The “store front” came off our building yesterday and we were pleased/amused to see the painted sign for The Happy Game Room that was visible in the 1980 tax photo. Our place has a commercial overlay, so it’s legal to run businesses out of the bottom two floors. Around 1980 the business that was in there was The Happy Game Room. At that time the neighborhood was going downhill quickly, but our building had an owner who seemed to care about the building. I’m not sure what all went on in The Happy Game Room, but it’s sorta fun that the sign is still there…

The remnants of The Happy Game Room sign

And no, we’re not restoring/keeping the sign. We don’t want to have people knocking on our tenants’ door wanting to play cards – lol.

More than anything else, I’m just happy the store front is gone and it’s starting to look like a normal brownstone again. We’re going to have french doors in the opening you see in the picture above, not a window like most brownstones. There are two entrances under the stoop, and the 2 foot wide entrance under the stoop into the rental apartment isn’t up to code (which requires 3 feet of width). BUT the good part is we can get to the cellar without having to go through the rental apartment.

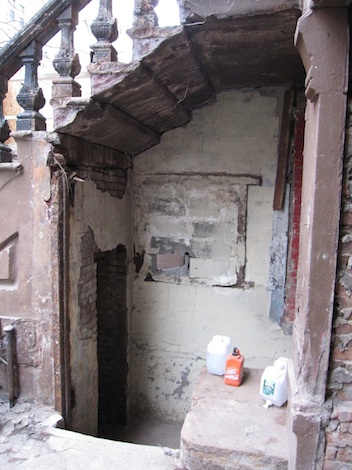
Two entrances under brownstone stoop Two entrances under a brownstone stoop in Harlem

In the photos above you can see how there’s a narrow walkway around the column into the apartment, and then wider stairs down into the cellar. That’s unusual for Harlem brownstones – usually there’s just the entrance into the apartment.

The blocked up opening you see above right will be reopened and a proper grille put in – more or less as it was originally.

Floors Continue To Take Shape…

When I went by our place yesterday I had visions of getting a role of painters tape and marking off where walls would be so we could get an idea of the various spaces. Then I saw the reality of the situation…

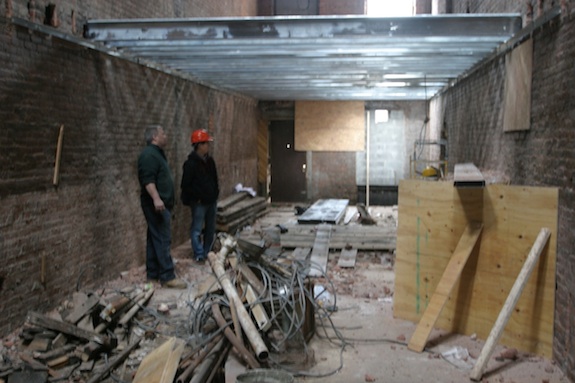
Basement level looking towards the rear of the building

There was just a lot more dirt and debris than I was expecting. Construction is a dirty business (literally). So what you’re looking at in the picture above is the main floor of our basement rental unit looking from the front of the building to the back. The joists for the floor between the rental unit and our parlor floor are half way in. It’s starting to feel like a real space and each of the rooms felt bigger than it did the other day when the joists were in but not the entire subfloor.

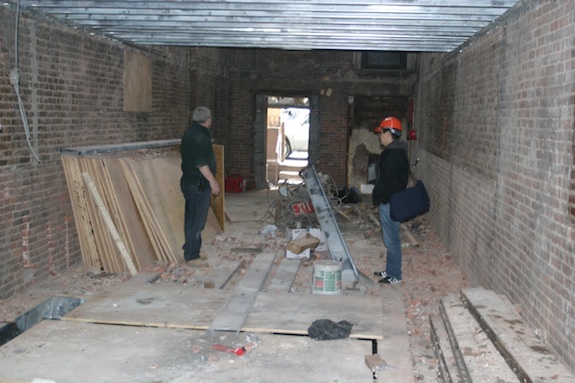
Here’s the same space looking from back to front (notice the car outside – which should give you a frame of reference)…

Basement rental unit starting to take shape

You can also see that they’ve thrown plywood over the opening for the stairs into the cellar.

Front door and huge future kitchen windowOne thing that’s quite visible now is the window on the parlor level on the front of the building. We always knew it was huge, but now you can see exactly how big it really is… Notice the size of the window compared to the size of the existing “front door”. It’s far bigger than a regular door – it’s 4’8″ x 7’7″!

It’ll be quite dramatic when it’s in because we’re doing tilt-n-turn windows, so the entire window can open up (much like a door). With the window open there will be incredible cross ventilation and it will be as if the kitchen is open to outside. Given that the street is right outside, that’s not an incredibly exciting prospect, but that’s OK for a kitchen (not so much for a living room had we put the living room in the front).

When it comes to the front door there will be a small vestibule – so two sets of doors. The outer doors will be made more or less in the style of the original doors. The opening is 10 feet high and just shy of 4 feet wide. So there will be two (French) doors that are 10 feet tall and 2 feet wide – very typical of Harlem brownstones (the historic preservationists should be happy).

Speaking of historic preservation we got a letter the other day saying the New York State Office of Historic Preservation has forwarded our tax credit application onto the National Park Service with a “recommendation to approve”. The big question is whether NPS will be OK with the vinyl windows we’re putting in our bathrooms. Typically vinyl windows are never allowed in historic buildings, BUT they’ll be in a location almost no one can see, and they’ll be literally in the shower area in each bathroom. It makes much more sense to put plastic windows in showers than a wood window that will rot with all the humidity and water spray. Still, I get the sense it’ll be a big exception for NPS to say OK to vinyl windows. Our fingers are crossed.

How Do You Get The Sprinkler Pipe Into The Joists?

Yesterday we stopped by the building to talk to the contractor. During the day I had realized something that was fairly serious… The plans call for the sprinklers to be recessed into the ceiling. But I couldn’t imagine how you’d get the sprinkler pipe threaded through the joists. Even if you could do it while the joists were being installed the sprinkler subcontractor hasn’t done the engineering yet to determine what size pipes go where.

So when I got to the job site one of my first questions to our contractor was “So how do you get the sprinkler pipe into the joists?” There was just a blank look on his on our contractor’s face (initially). First he suggested visible sprinkler pipes, but I said ‘no’ and that Dan would go ballistic if we had to do that. His foreman (vice-president) was standing there and suggested the sprinkler pipe be run along the side and hidden with crown moulding. I reminded him we weren’t putting in crown moulding. He said, well, I guess we’ll have to put it in. I just shook my head ‘no’. Crown moulding just doesn’t work with the aesthetic we’re trying to achieve.

The contractor then said that usually sprinkler pipe is run inside a “second ceiling” – in other words they hang wall studs below the joists and run the pipe in there. BUT that hadn’t been calculated into the floor-to-floor heights that we needed to achieve 8′ ceilings. Needless to say, I was really glad that a moment before he had told me that it looked like we’d get 8’2″ to 8’3″ of ceiling height on the basement level (the rental unit) – we might need that 2 to 3″ for sprinklers.

I then called the architect and he said one other option is to notch the bottom of the joists, put the pipe up into the joists and then patch the bottom of the joist so it regains it’s strength (something you can only do with metal joists). Doesn’t sound like an optimal solution, but at least we have another option.

So it looks like we have two options. One is to lower the ceiling a bit and run the pipes below the joists. The other is to cut into the joists and then patch the bottom of the joists. I’m just glad I thought of it when I did. I’d rather be having this conversation now – when there’s just 1 and a half floors in – than when all the floors are framed. It’s also good that it came up on a Friday. Now the contractor has the weekend to think about it and talk to his plumber. Perhaps the plumber has seen another solution that we haven’t though of yet.

It’ll be interesting to see how it gets resolved…

UPDATE:

After writing this I thought up one more solution I like better than the other two… Run the “trunks” for each floor in the western wall. Then run “branches” up and into the joists wherever a head is required. The only complication are heads opposite stairwells, but I think we can work solutions for each of those locations.

FINAL SOLUTION:

It’s now 5 months later and the sprinklers are being put in. The solution was to run short sections of sprinkler pipe through the joists. Here’s a picture showing what I’m talking about (click to see bigger version)…

sprinkler pipe through metal joistsHowever, our plumber only seems comfortable doing that with the smallest diameter pipe. He didn’t want to run any main lines through the joists. So instead of having one sprinkler riser going up through our plumbing wall we have two smaller ones – one for the back of the building and one for the front of the building. Then there are branch lines off of those that either run through the walls or run parallel with the joists. Using that strategy only thin (1″) pipe needs to be snaked through the joists.

The first floor…

We stopped by the house yesterday to check in with our contractor and the subfloor was being put down between the cellar and the basement. It felt weird to walk into the building on an actual floor – even if what I was walking on was just plywood thrown onto joists.
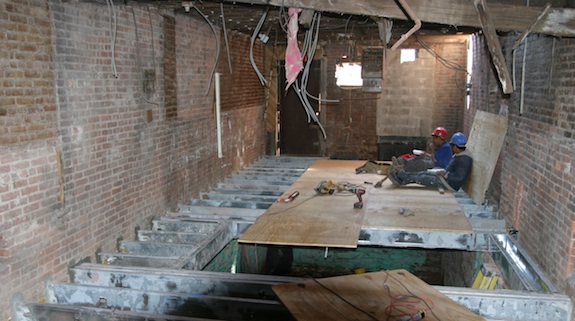
The first of the floors to go into the house

I’m standing about 1/3rd of the way into what will be the rental unit. The hole you see is where the stairs will go so the tenant can get down into the cellar – the tenant will have “accessory space” down there they can use as a workroom, a den, a media room, etc. The workers are sitting (to each lunch) in what will be a bedroom – more or less where the bed will be.

I need to check next time but I think the new joists make it so the back door can’t be opened since we’re raising the floor a few inches. Where the workers are sitting will be where the tenant will put his/her bed. The window in their bedroom (currently blocked up) is quite large – 3’9″ x 5’10”. It’s south facing so it (and the door next to it) will let in tons of light, though we will have a 4′ deep deck outside that will give them some shade.

The big hole between the door and the window is where a previous occupant cut a hole for an air conditioner. It’s only supported by the air conditioner sleeve that’s in there – so a bit precarious. Needless to say that’s high on the list to get fixed.
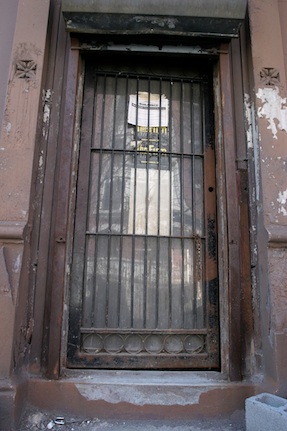
Our front doorYou can see where the upper part of the wall has been sealed. We went next door to meet the neighbor and saw saw that that they have what we used to have – a half wall on the bottom and exposed brick on top. The half wall is where electrical wires ran, etc. We’ll be having full (insulated) walls on the exterior walls and a completely exposed wall on the party wall.

Our contractor cut the lock on the front door, so we also saw our front door for the first time yesterday (right). It needs a paint job, but it’s pretty solid – though it does make you feel like you’re going into a fortress or something. Still, it’s way better than the crappy door that was there in the 1980 tax photo. We’ll be taking it out and putting in a door that more-or-less replicates the original french doors that were on the building.

Since we now have access to the front door, we can see what our parlor floor looks like…
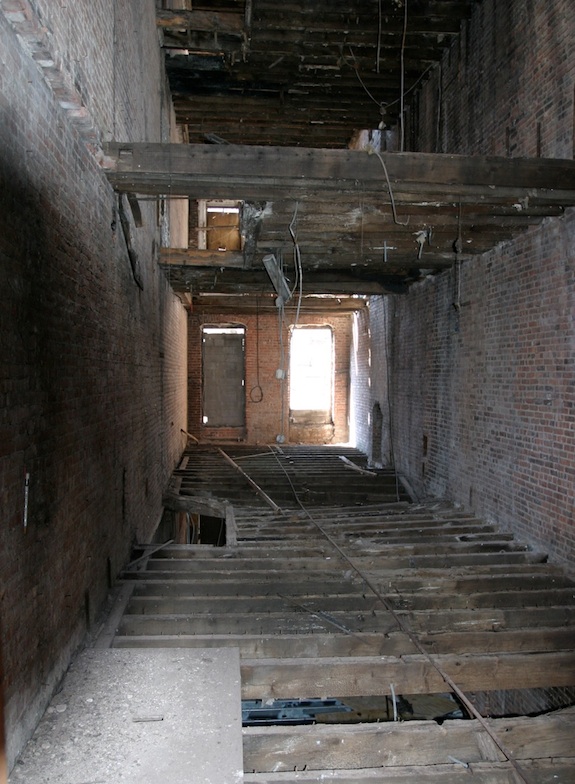
The parlor floor of a Harlem brownstone shell - before renovation

As you can see by all the sagging, the joists are in poor quality here too…

There will be a kitchen to the right just inside the front door. Then a central staircase wrapping around a central core. Then the dining area and then the living room in the rear.

We’ll be making the window on the left into a door and there will be a small 4′ deep deck going across the house. The deck will have a pergola  so we can have vines grow up that will give us some shade in the summer. There will also be stairs down from the porch into the garden. The window on the right is even bigger than the one in the basement – 3’9″ x 8′. That (and the door) will give us tons of light in our living room since that’s a southern exposure. The window will be a tilt-n-turn, so it can open up completely like a door (only it doesn’t go all the way to the ground). With the window and door open the living room will feel completely connected to the outdoors – which should be nice when the weather is mild.

Here are a couple other cool shots taken from the front door…
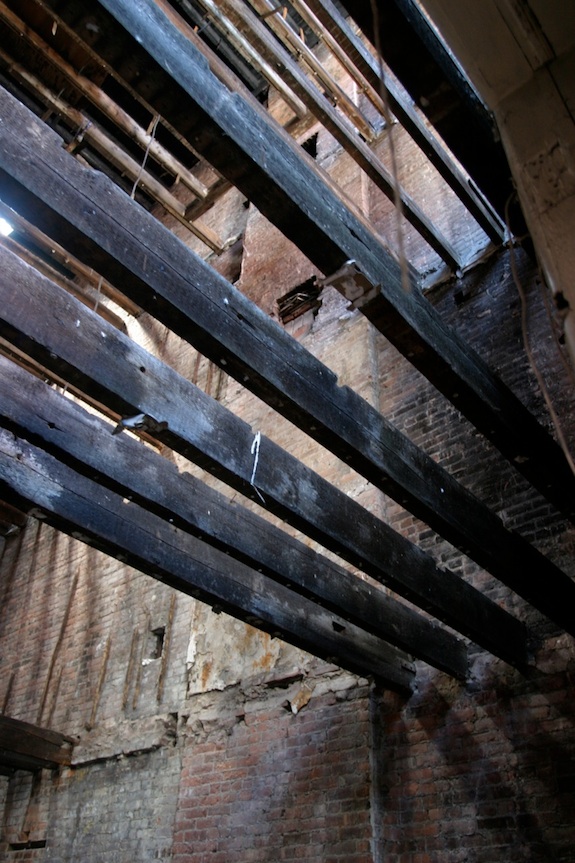
Fireplace openings in a brownstone shell in Harlem

Notice in the picture below that even the “good” joists have had things done to them that severely weaken them. You can see a notch out of the top of the joist – typically done to run wires. If you put a 2″ notch in a 10″ beam that makes it the same as an 8″ beam – severely weakening it. If you need to run something through a beam the hole should go in the center of the beam.
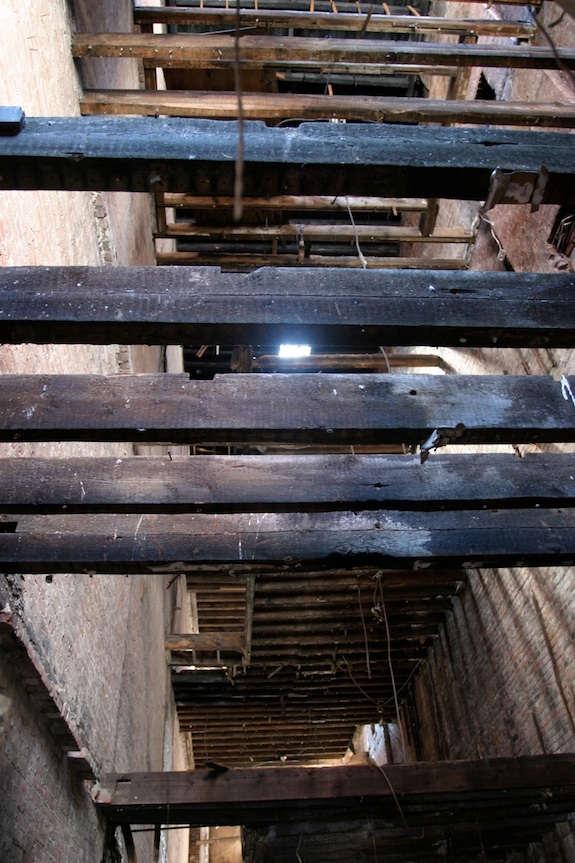
Inside of gutted townhouse shell in Harlem

Cool Under Construction Photo

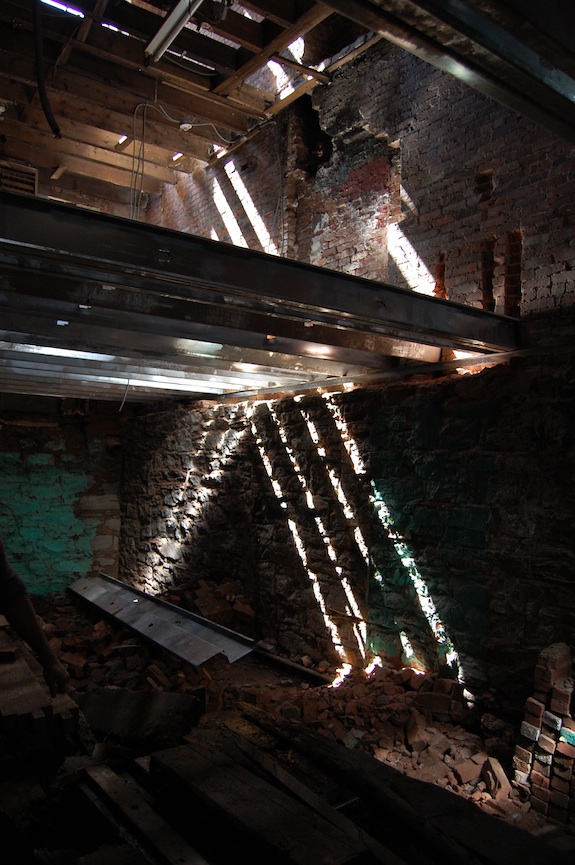
This past Saturday we had architecture students from CityTech come see the house. Dan’s a (web design) professor at CityTech and one of the architecture professors (Ken Conzelmann) took the photo below. I think it’s pretty cool – with the light streaming through the joists it’s quite beautiful…

light streaming in a townhouse shell

I love the height of everything, but of course that will go away with the renovation since floors will go in.

The “hole” in the wall is an old fireplace. The previous owner (a developer/landlord) had pretty much ripped it out. We’ll fill the hole back in with brick to make the wall stronger.

You can also see that we’re raising the floor between the cellar and basement to give a full 8′ clearance in the cellar. The joists used to rest on top of the foundation – now they’re a few inches higher.